From My Kitchen to Yours: The Potato Pave Journey That Changed Everything
Oh, friends, have I got a treat for you today! Let’s talk about potato pave. If you haven’t met this beauty yet, you’re in for something special. This isn’t just, you know, potatoes. It’s like the VIP lounge of potato dishes! Imagine super-thin slices of potato, all layered up, baked until the edges are unbelievably crispy and golden, while the inside stays all soft, creamy, and dreamy. Pure magic!
I first stumbled across the idea of a potato pave years ago. I was looking for a side dish that was a bit of a showstopper but wouldn’t have me crying in the kitchen from stress. And let me tell you, my first few attempts? Well, let’s just say my family ate some… interesting potato constructions. There was a bit of a learning curve to get those layers just right and the bake perfect. But after a good amount of trial and error (and eating a LOT of potatoes – tough job, I know!), I finally cracked the code. And boy, oh boy, was it a “YES!” moment in the kitchen. This recipe turns plain old spuds into something that looks and tastes incredibly fancy, but (and this is our little secret) it’s actually way easier than it seems. It’s become my absolute go-to for making any meal feel a bit more special, and it always, always gets rave reviews.
What You’ll Need: The Potato Pave Dream Team
Alright, let’s get our ingredients lined up! To whip up your own slice of potato pave heaven, you’ll need these simple players. It’s all about how they come together – that’s the delicious secret!
- Potatoes, Potatoes, Potatoes: You’ll want about 2.5 pounds (that’s around 1.1kg) of good ol’ starchy potatoes. My absolute faves for this are Russets. They get so wonderfully fluffy inside and those crispy edges are just chef’s kiss. Yukon Golds are a close second, giving you a lovely buttery vibe.
- Heavy Cream: One cup (240ml). This is the good stuff that makes those layers all luscious and amazing. You could technically use half-and-half if you’re trying to be a bit lighter, but honestly, the full-fat cream is where the magic is for potato pave.
- Unsalted Butter: Half a cup (113g), and you’ll want it melted. This is for brushing and getting that beautiful golden-brown color. If you happen to have ghee, it adds a lovely nutty touch!
- Garlic: Two or three cloves, minced up really, really fine. Or, if you’re a garlic fiend like me, maybe sneak in an extra one. Nobody’s judging! If you’re in a real pinch, about 1/2 teaspoon of garlic powder will do.
- Fresh Thyme: About a tablespoon, chopped up. Dried thyme works too, about 1 teaspoon. Fresh rosemary is also amazing here, or hey, why not a mix? The smell while this bakes? You guys, it’s incredible.
- Salt: Around 1.5 teaspoons, but definitely taste as you go (well, not the raw potatoes, but you know what I mean for other things!). Potatoes just soak up salt.
- Black Pepper: Half a teaspoon of freshly ground, or to your liking.
- Optional Bling: Some fresh chives or parsley, chopped up for a little sprinkle of green at the end. Makes it look extra pretty!

Timing is Everything (But Seriously, Don’t Sweat It!)
Okay, let’s talk time. Here’s a little roadmap for your potato pave adventure. And please, don’t let the total time freak you out! Most of it is just the oven doing its thing, which means you can be prepping other yummies or, you know, actually sit down for a minute!
- Getting Your Hands Dirty (Prep Time): Give yourself about 30 to 40 minutes. This really just depends on how speedy you are with slicing those potatoes. If you’ve got a mandoline, you’ll be flying. If it’s you and a sharp knife, just put on some good tunes and enjoy the process!
- Oven Time (Cooking Time): This will be around 60-75 minutes for the first bake. Then, if you’re making individual crispy portions (which I totally recommend!), another 15-20 minutes.
- The Chill Out (Resting/Pressing Time): This is a SUPER important step, don’t skip it! You need at least 30 minutes for it to cool and press, but honestly, a few hours in the fridge, or even overnight, is the golden ticket for those perfectly neat, sliceable layers.
- The Grand Total (Not counting a long press): You’re looking at roughly 2 hours to 2 hours 30 minutes from start to when you could serve it.
Let’s Build This Potato Pave: Your Step-by-Step Guide to Awesome!
Alright, team, let’s roll up our sleeves and get to the really fun part – making your very own jaw-dropping potato pave. I’ll walk you through every step. Just remember to have fun with it; cooking should be a joy!
Step 1: Oven On, Pan Ready!
First up, get that oven preheating to 350°F (that’s 175°C). Now, find yourself a standard loaf pan – something around 8.5 x 4.5 inches or 9 x 5 inches will be perfect. Line it with parchment paper, and here’s a little trick: leave some paper hanging over the long sides like little handles. This will be your best friend later for lifting the whole potato pave out in one piece. Give that parchment a little brush with some of your melted butter.
Step 2: The Great Potato Slice-a-Thon!
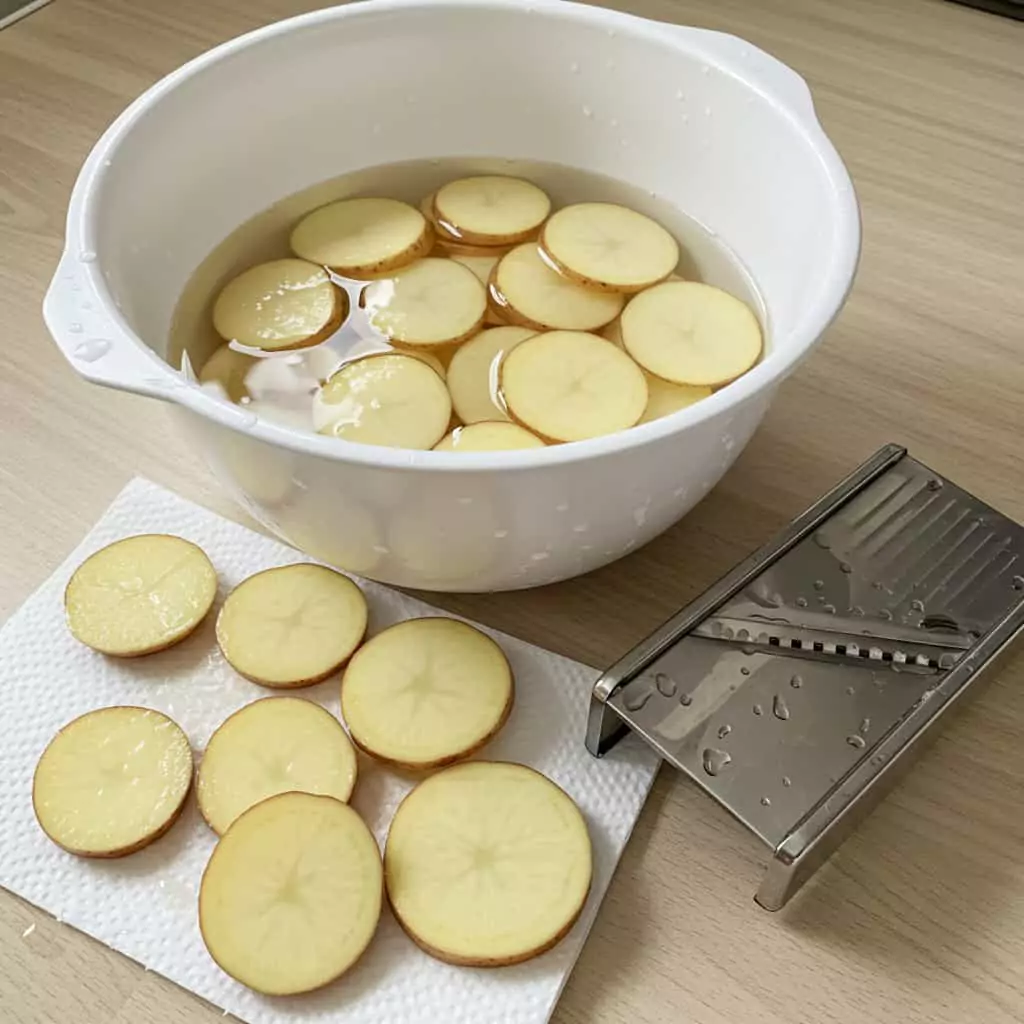
This is where the transformation truly begins. Peel your potatoes. Then, using a mandoline (aim for about 1/16th of an inch or 1.5mm – we want them wafer-thin!) or a super-duper sharp knife and a steady hand, slice ’em up into nice, even rounds. The more uniform they are, the more evenly everything will cook and the prettier it’ll look. As you’re slicing, it’s a good idea to pop the slices into a bowl of cold water. This stops them from going brown. Once they’re all sliced (phew!), drain them really, really well and then pat them dry with a clean kitchen towel or some paper towels. Don’t skip the drying part – it’s a big help for getting things crispy!
Step 3: Make That Cream Sing!
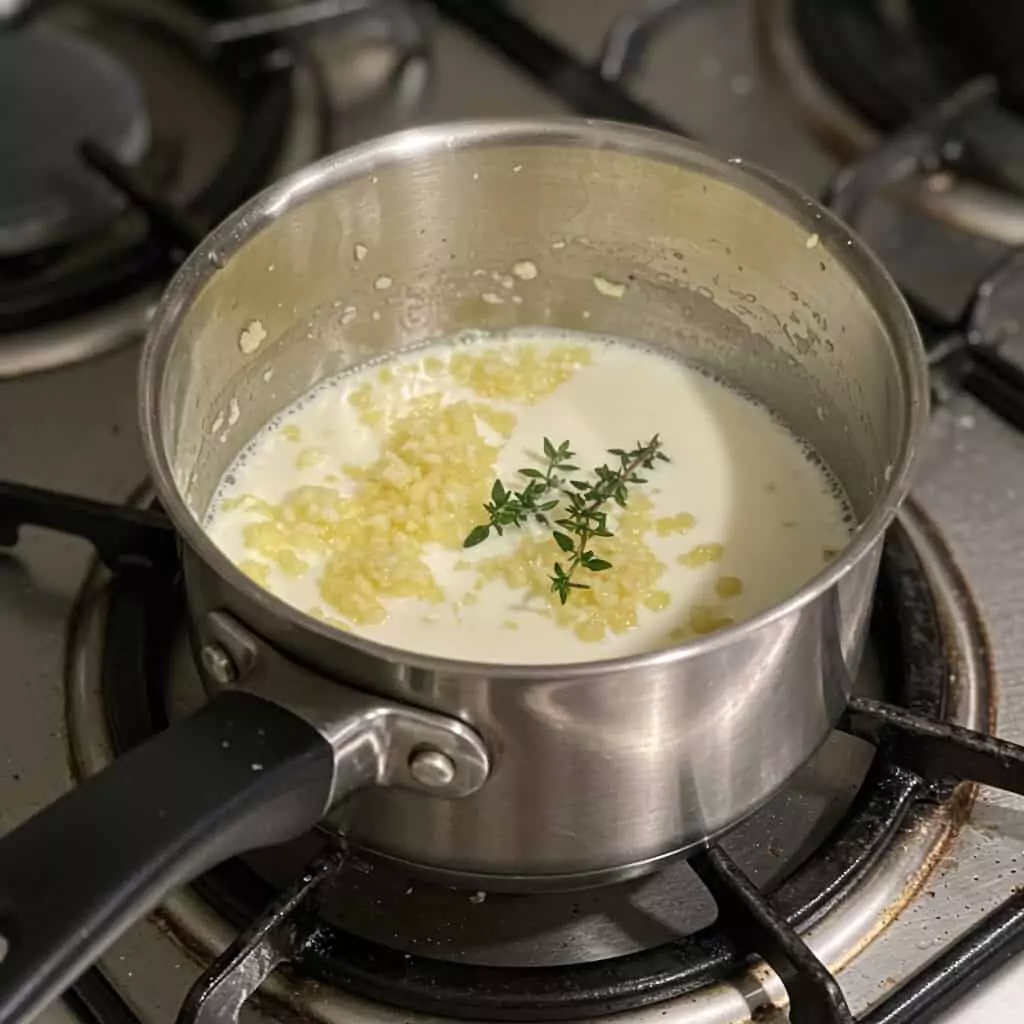
In a little saucepan, gently warm up your heavy cream with that finely minced garlic and the chopped thyme. Keep the heat on medium-low. You’re not looking for a boil here, just a nice gentle warmth to let those gorgeous flavors meld into the cream. About 5 minutes should do the trick. Oh, the aroma! This little step is what makes your potato pave smell absolutely divine while it’s baking. Take it off the heat when it’s done.
Step 4: Layer It Up, Buttercup! (Building Your Potato Pave)
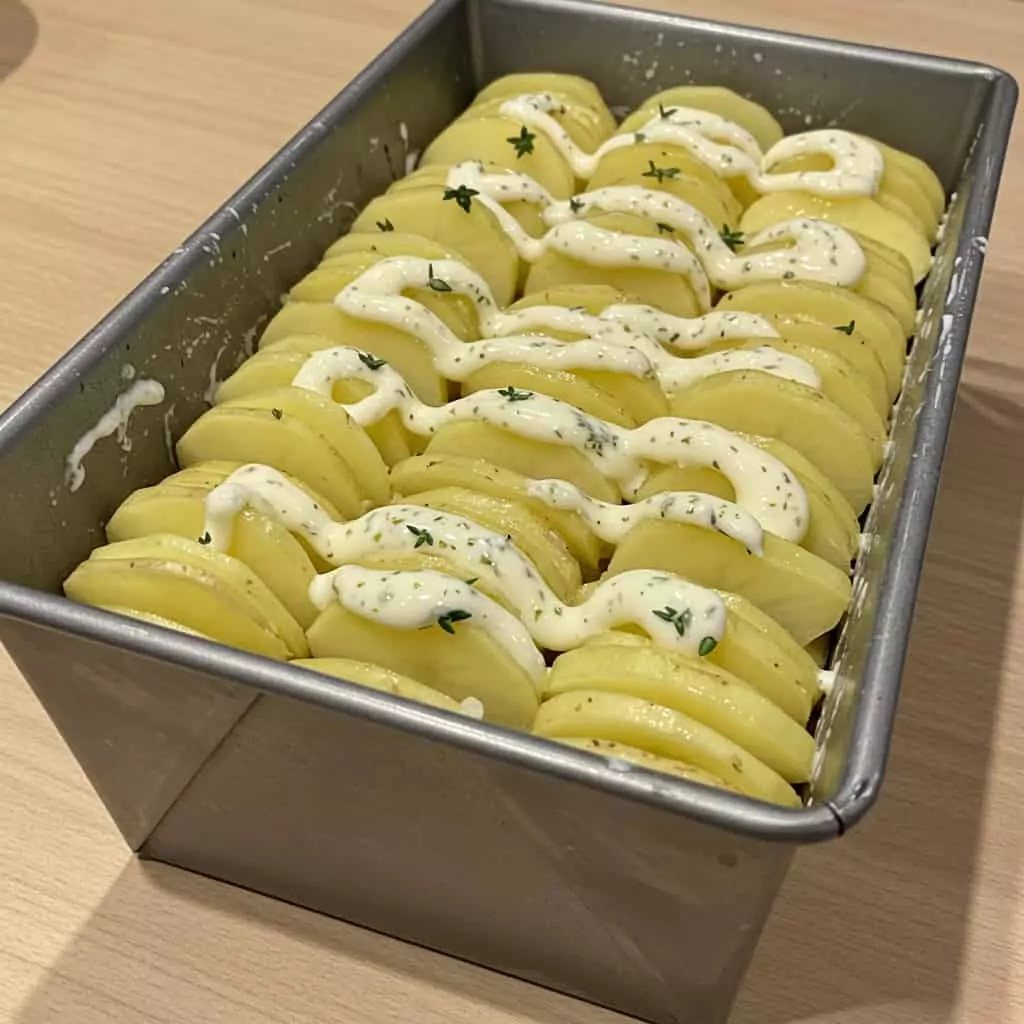
Okay, this is the assembly line, and it’s actually pretty therapeutic. Start by arranging a single layer of your potato slices in the bottom of your buttered and parchmented loaf pan. Overlap them a bit – think of pretty, delicate fish scales. Now, give this layer a light brush with some of that melted butter, then a little sprinkle of salt and pepper. Drizzle a tablespoon or two of that beautiful, infused cream mixture over the potatoes. And then? You just repeat! Potato layer, little brush of butter, sprinkle of salt and pepper, drizzle of cream. Keep on going until you’ve either run out of potatoes or your pan is nicely full. Try to make your very top layer look extra lovely and neat. For that final layer, be generous with the butter brush and pour any leftover cream mixture evenly over the top. Bam!
Step 5: The First Cozy Bake
Cover your loaf pan nice and tight with aluminum foil. Carefully slide it into your preheated oven and let it bake for about 60-75 minutes. You’ll know it’s getting there when you can slide a knife or a skewer right into the center and it meets hardly any resistance. The potatoes should be wonderfully tender.
Step 6: Press It! Press It Real Good! (The Secret to That Sleek Look)
This step, my friends, is absolutely KEY for getting that classic, dense, elegant potato pave texture we’re after. Carefully take off the foil – and watch out for that hot steam! Lay another piece of parchment paper directly onto the top of the potatoes. Now, you need to find something heavy that’ll fit right inside the loaf pan to press down on those spuds. Another loaf pan filled with some pie weights or even dried beans works like a charm. I’ve even used a couple of food cans wrapped in foil in a pinch! Let it sit on your counter to cool down for at least 30 minutes with those weights on top. Even better? If you can manage it, pop the whole weighted shebang into the fridge for a few hours, or even let it hang out there overnight. The longer it presses and chills, the more compact and perfectly sliceable your potato pave will be. Trust me on this one!
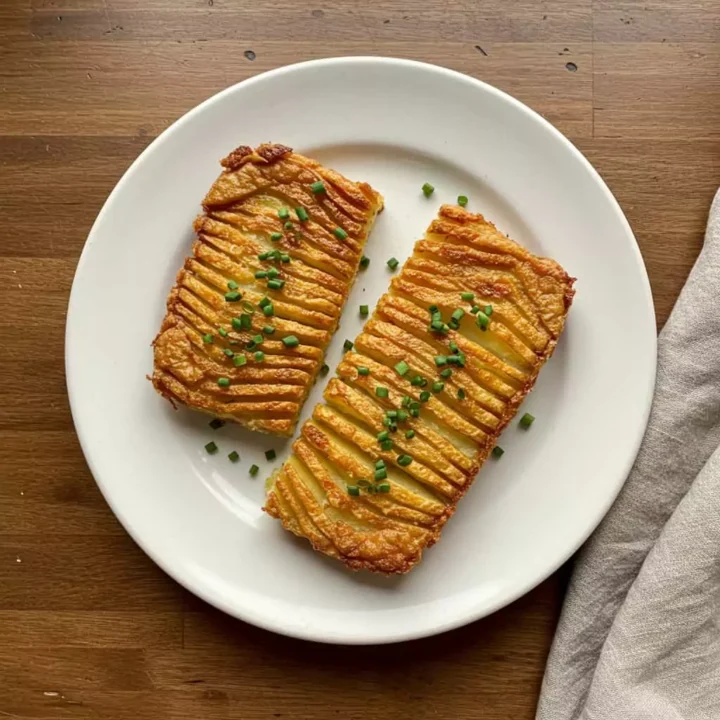
Step 7: Slice, Sizzle, and Serve! (Optional, But Oh-So-Worth-It!)
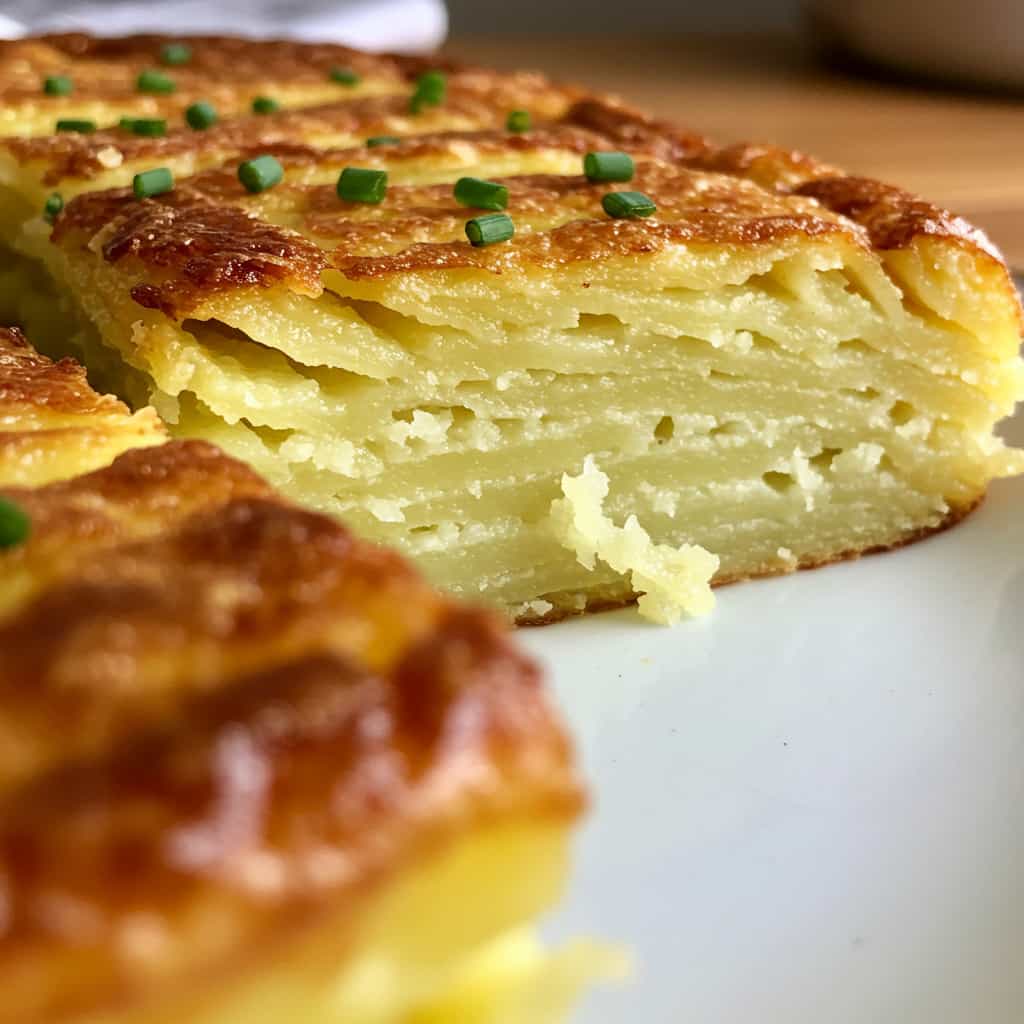
Once your potato pave is nicely chilled and has been properly pressed, use those parchment paper “handles” to lift it right out of the pan and onto a cutting board. If you want to be extra fancy, you can trim the edges for a super neat, restaurant-style presentation (and those trimmings? Chef’s snack!). Then, slice it into whatever portions make you happy – neat squares, classy rectangles, or even thick, satisfying “steaks.”
Now, for those unbelievably crispy edges that everyone goes nuts for: You’ve got options! You can gently pan-fry the slices in a little bit of butter or olive oil in a skillet over medium heat for a few minutes on each side. You’re looking for golden brown and heated all the way through. OR, you can lay the slices out on a baking sheet and pop them back into a hotter oven, say 400°F (200°C), for about 15-20 minutes, or until they’re gloriously golden and crispy. That second bake or pan-fry? That’s where the texture just goes to a whole other level of awesome!
Recipes You May Like
Serving Your Stunning Potato Pave: Let’s Plate It Up!
Okay, take a moment to admire your handiwork because your potato pave is looking seriously gorgeous! So, how do you serve this masterpiece? Honestly, the sky’s the limit! It’s an absolutely incredible side dish next to a beautifully roasted chicken, a flaky seared fish fillet, or even a hearty lentil roast for a veggie main. It just makes everything on the plate feel a bit more special. Sometimes, especially if I’m feeling a bit fancy, I’ll make smaller, individual portions and serve them as an elegant appetizer. A little dollop of sour cream (or a lovely plant-based creamy alternative) and a tiny sprinkle of fresh chives? Hello, impressive! And don’t just save this potato pave for big dinner parties! It can make any old weeknight meal feel like an occasion. It’s also amazing with brunch – imagine a little slice next to some eggs. Oh yeah. Don’t be shy about trying it with different things! A tiny drizzle of truffle oil (if you’re into that sort of deliciousness) just before serving can also send it over the moon.
Why I’m Utterly, Completely Hooked on This Potato Pave!
Seriously, you guys, once you make this potato pave, you’ll totally get why I’m so obsessed. It’s that mind-blowing combo of those crackly, golden, crispy edges and that unbelievably soft, creamy, flavor-packed interior. It looks like something you’d get at a high-end restaurant, but it’s genuinely pretty straightforward to pull off in your own kitchen. Every single time I make this for people, they absolutely rave, and everyone always, always asks for the recipe. Seeing their happy, well-fed faces makes every single minute of potato slicing totally worth it! I honestly think this is one of the absolute best ways to eat a potato. Period.
So, what are you waiting for? Go on, give this potato pave recipe a whirl! I am dying to hear how it goes for you. Please, please drop me a comment below and tell me all about it – did you love it? Did you put your own spin on it? Let me know! Happy cooking, everyone!
potato pave
Elegant potato pave with crispy layers. An easy yet impressive side dish perfect for any occasion. Make this stunning recipe today!
Ingredients
- Potatoes starchy 2.5 lbs or 1.1kg Russets recommended
- Heavy Cream 1 cup or 240ml
- Unsalted Butter 1/2 cup or 113g melted
- Garlic 2-3 cloves minced very fine or 1/2 tsp garlic powder
- Fresh Thyme 1 tbsp chopped or 1 tsp dried
- Salt 1.5 tsp or to taste
- Black Pepper 1/2 tsp freshly ground or to taste
- Optional Garnish: Fresh chives or parsley chopped
Instructions
Step 1: Oven On, Pan Ready!
First up, get that oven preheating to 350°F (that’s 175°C). Now, find yourself a standard loaf pan – something around 8.5 x 4.5 inches or 9 x 5 inches will be perfect. Line it with parchment paper, and here’s a little trick: leave some paper hanging over the long sides like little handles. This will be your best friend later for lifting the whole potato pave out in one piece. Give that parchment a little brush with some of your melted butter.
Step 2: The Great Potato Slice-a-Thon!
This is where the transformation truly begins. Peel your potatoes. Then, using a mandoline (aim for about 1/16th of an inch or 1.5mm – we want them wafer-thin!) or a super-duper sharp knife and a steady hand, slice ’em up into nice, even rounds. The more uniform they are, the more evenly everything will cook and the prettier it’ll look. As you’re slicing, it’s a good idea to pop the slices into a bowl of cold water. This stops them from going brown. Once they’re all sliced (phew!), drain them really, really well and then pat them dry with a clean kitchen towel or some paper towels. Don’t skip the drying part – it’s a big help for getting things crispy!
Step 3: Make That Cream Sing!
In a little saucepan, gently warm up your heavy cream with that finely minced garlic and the chopped thyme. Keep the heat on medium-low. You’re not looking for a boil here, just a nice gentle warmth to let those gorgeous flavors meld into the cream. About 5 minutes should do the trick. Oh, the aroma! This little step is what makes your potato pave smell absolutely divine while it’s baking. Take it off the heat when it’s done.
Step 4: Layer It Up, Buttercup! (Building Your Potato Pave)
Okay, this is the assembly line, and it’s actually pretty therapeutic. Start by arranging a single layer of your potato slices in the bottom of your buttered and parchmented loaf pan. Overlap them a bit – think of pretty, delicate fish scales. Now, give this layer a light brush with some of that melted butter, then a little sprinkle of salt and pepper. Drizzle a tablespoon or two of that beautiful, infused cream mixture over the potatoes. And then? You just repeat! Potato layer, little brush of butter, sprinkle of salt and pepper, drizzle of cream. Keep on going until you’ve either run out of potatoes or your pan is nicely full. Try to make your very top layer look extra lovely and neat. For that final layer, be generous with the butter brush and pour any leftover cream mixture evenly over the top. Bam!
Step 5: The First Cozy Bake
Cover your loaf pan nice and tight with aluminum foil. Carefully slide it into your preheated oven and let it bake for about 60-75 minutes. You’ll know it’s getting there when you can slide a knife or a skewer right into the center and it meets hardly any resistance. The potatoes should be wonderfully tender.
Step 6: Press It! Press It Real Good! (The Secret to That Sleek Look)
This step, my friends, is absolutely KEY for getting that classic, dense, elegant potato pave texture we’re after. Carefully take off the foil – and watch out for that hot steam! Lay another piece of parchment paper directly onto the top of the potatoes. Now, you need to find something heavy that’ll fit right inside the loaf pan to press down on those spuds. Another loaf pan filled with some pie weights or even dried beans works like a charm. I’ve even used a couple of food cans wrapped in foil in a pinch! Let it sit on your counter to cool down for at least 30 minutes with those weights on top. Even better? If you can manage it, pop the whole weighted shebang into the fridge for a few hours, or even let it hang out there overnight. The longer it presses and chills, the more compact and perfectly sliceable your potato pave will be. Trust me on this one!
Step 7: Slice, Sizzle, and Serve! (Optional, But Oh-So-Worth-It!)
Once your potato pave is nicely chilled and has been properly pressed, use those parchment paper “handles” to lift it right out of the pan and onto a cutting board. If you want to be extra fancy, you can trim the edges for a super neat, restaurant-style presentation (and those trimmings? Chef’s snack!). Then, slice it into whatever portions make you happy – neat squares, classy rectangles, or even thick, satisfying “steaks.”
Now, for those unbelievably crispy edges that everyone goes nuts for: You’ve got options! You can gently pan-fry the slices in a little bit of butter or olive oil in a skillet over medium heat for a few minutes on each side. You’re looking for golden brown and heated all the way through. OR, you can lay the slices out on a baking sheet and pop them back into a hotter oven, say 400°F (200°C), for about 15-20 minutes, or until they’re gloriously golden and crispy. That second bake or pan-fry? That’s where the texture just goes to a whole other level of awesome!
Notes
Potato Choice: Russets are highly recommended for their starchy texture which yields fluffy interiors and crispy edges Yukon Golds are a good alternative for a more buttery flavor
Slicing Thinness: Uniformly thin slices are key for even cooking and texture A mandoline is very helpful for this
Pressing Importance: Do not skip pressing This step compacts the layers creating the signature dense and elegant texture of potato pave
Crisping Slices: The optional final crisping step significantly enhances texture and flavor Highly recommended for the best experience
Serving Ideas: Serve as an elegant side with roasted meats fish or vegetarian mains Also great as a sophisticated appetizer
Nutrition Information
Yield
7Serving Size
1Amount Per ServingCalories 384Total Fat 26gSaturated Fat 16gTrans Fat 0gUnsaturated Fat 8gCholesterol 74mgSodium 528mgCarbohydrates 35gFiber 4gSugar 3gProtein 5g