Oh myy you guys, am I STOKED to share this recipe with you today! If you’re anything like me and dream of a dessert that’s ridiculously easy to whip up but tastes like you’ve spent hours (or hired a private chef!), then you absolutely have to meet my good friend, the Lemon Posset. My love affair with this stunner of a dessert kicked off a few years back. Picture this: dinner party, slight (okay, major) kitchen chaos, and me needing something seriously impressive but also completely foolproof. After a few wonderfully messy (and tasty!) experiments – I think it took about five or six tries to get the lemon-to-cream ratio just right and nail the perfect chill time – I finally landed on THE one. This version. What’s the big deal, you ask? It’s the sheer, beautiful simplicity! We’re talking a handful of basic ingredients that magically transform into this silky, zippy, utterly divine creamy lemon dream. Seriously, this Lemon Posset has become my not-so-secret weapon for adding a bit of fancy to any meal, without any of the fuss.
Ingredients List for Your Dreamy Lemon Posset
Alright, let’s get ready for a little kitchen magic! You’ll be absolutely gobsmacked at how these everyday bits and bobs come together. I’ve kept the list super simple, with a few little nudges for substitutions if you’re in a pinch.
- Heavy Cream (Double Cream): You’ll need 600ml (that’s about 2 ½ cups). This is the heart and soul of the Lemon Posset, the stuff that gives it that incredible, luxurious, I-can’t-believe-it’s-not-custard texture. Please, please, please use full-fat here; it’s the secret handshake for the perfect set. You could try a high-fat single cream, but trust me, the set might be a bit softer, more like a very thick sauce than a delicate pudding.
- Granulated Sugar: 150g (that’s roughly ¾ cup). This little sweetheart is here to perfectly balance out that gorgeous tartness from the lemons. Feel free to nudge it up or down by a tablespoon or so, depending on how much of a sweet tooth you’ve got. Caster sugar? Absolutely fine, it dissolves like a dream.
- Fresh Lemons: Grab about 3 to 4 nice, medium-sized lemons. We’re aiming for 100ml (a good, generous ⅓ cup) of freshly squeezed lemon juice. Don’t forget the zest! You’ll want about 1 tablespoon of finely grated zest – it adds this amazing aromatic pow-wow to the whole thing. If you ever spot Meyer lemons, grab ’em! They give a slightly sweeter, almost floral hint that’s just lovely in a Lemon Posset.
- (Optional, but nice!) Vanilla Extract: Just ½ a teaspoon. A tiny whisper of vanilla can sometimes round out the flavors, but honestly, a classic Lemon Posset is absolutely spectacular all on its own.
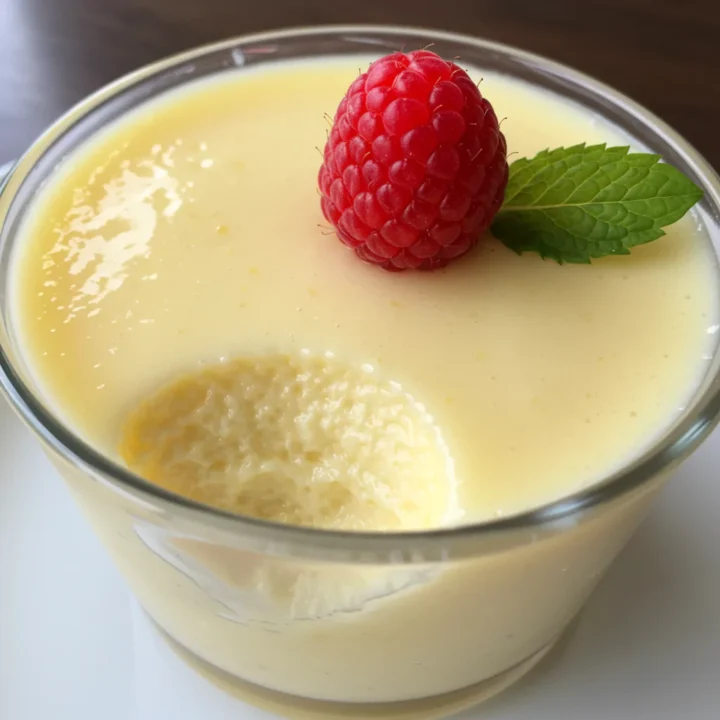
- (For Looking Pretty – optional, but who doesn’t love pretty?): Fresh berries are your best friend here – raspberries, blueberries, a little slice of strawberry – they all look stunning. A sprig of mint never hurt anyone, or a tiny, elegant dusting of powdered sugar. Oh, and a thin shortbread cookie on the side? Chef’s kiss! That’s the classic way to serve a Lemon Posset.
My little secret: When you’re zesting those lemons, try to only get the bright yellow skin. The white pith underneath can be a bit on the bitter side, and we don’t want that crashing our dessert party!

Timing Your Lemon Posset to Perfection
One of the absolute best parts about making this Lemon Posset (besides eating it, obviously!) is how darn quick it is to throw together. It does need some quality time in the fridge to set up and work its creamy magic, though. So, let’s map it out:
- Getting Your Ducks in a Row (Prep Time): I’d say about 15 minutes. This is for zesting and juicing those lovely lemons, and measuring out your cream and sugar. If you’re a lemon-zesting ninja, you might even do it faster! You know how some fancy desserts can have you tied to the counter for ages? This Lemon Posset is so much quicker on the active prep – we’re talking a breeze compared to many multi-step puddings.
- Stovetop Time (Cooking Time): Roughly 10-12 minutes. That’s all it takes to get the cream nice and warm and make sure that sugar is fully dissolved.
- Chill Out Time (Essential!): This is where the patience comes in. You need at least 4 hours in the fridge. But, if you really want the best, most perfectly spoonable, creamy texture, aim for 6 hours or even let it chill overnight.
- Total Hands-On Time (excluding chilling): You’re looking at around 25-30 minutes, tops. This makes the actual making of your Lemon Posset super efficient. It’s way less faff than you’d think for something so elegant!
So, what this means is you can easily whip this glorious dessert up in the morning for a dinner treat that night, or even make it the day before. Honestly, the anticipation of that chilled, tangy, creamy Lemon Posset is half the fun!
Step-by-Step to Your Perfect Lemon Posset
Ready to make some citrus sunshine in a bowl? Just follow these simple steps, and I promise you’ll have a foolproof Lemon Posset every single time. It really is easier than it looks to get that amazingly smooth, rich texture.
Step 1: Lemon Prep!
Okay, first things first, let’s get our lemon power ready. Give those lemons a good wash. Using a microplane or the finest side of your grater, carefully zest about two of the lemons. You’re aiming for about a tablespoon of lovely, fragrant zest. Just the yellow stuff, remember! Then, squeeze those lemons until you’ve got 100ml of fresh juice. Pour this juice through a little fine-mesh sieve – this catches any pesky pips or bits of pulp. We want our final Lemon Posset to be as smooth as silk. Pop the zest and juice to one side. My go-to trick: I always roll my lemons firmly on the countertop before I juice them. I swear it helps get every last drop out!
Step 2: Cream and Sugar, Meet the Heat
Grab a medium-sized, heavy-bottomed saucepan. Using a good pan really does help stop the cream from sticking and making a fuss on the bottom. Pour in your lovely heavy cream and add the granulated sugar. Pop the pan over a medium heat. Now, gently stir, stir, stir with a whisk or a wooden spoon. This helps the sugar dissolve and stops a skin from trying to form on top of the cream. You want to bring this mixture to a gentle simmer – you’ll see little bubbles starting to form around the edges.
Step 3: The Magic Boil
Once your creamy, sugary mix is simmering away nicely and all that sugar has definitely dissolved (give the bottom of the pan a little feel with your spoon – no grittiness allowed!), let it boil gently. And I mean gently. Set a timer for exactly 3 minutes. Keep an eye on it and give it an occasional stir to make sure it doesn’t get any ideas about boiling over. This boiling step is super important; it’s what helps the cream thicken up just right and basically tells your Lemon Posset that it needs to set beautifully later. Little insider tip: I’ve seen some recipes say you only need to boil it for a minute, but honestly, after making this Lemon Posset more times than I can count, I’ve found that 3 minutes is the magic number for a consistently perfect, dreamy set with these amounts. Trust me on this one!
Step 4: Lemon Lovin’ Time
Okay, saucepan off the heat! Now it’s time to introduce your cream to its zesty best friend. Stir in the lemon zest you prepped earlier and that beautifully strained lemon juice. If you decided to go with vanilla extract, now’s its moment to shine too. Whisk everything together, gently but make sure it’s all mixed, for about 30 seconds. You’ll notice something pretty cool happen – the mixture will start to thicken up a tiny bit, almost straight away. That’s the acid in the lemon juice working its magic on the hot cream. It’s like a mini science experiment right in your kitchen! How cool is that?
Step 5: Strain for Smoothness (and Pour!)
For that truly professional, ultra-smooth, “did-you-buy-this?” kind of Lemon Posset, I really recommend straining the mixture one last time. Get a clean jug or bowl and pour the warm posset mixture through your fine-mesh sieve again. This will catch the zest (though, personally, I sometimes like leaving a few tiny flecks of zest in for looks – your call!) and any other little bits that might have formed. Now, from your jug, carefully pour this gorgeous, warm, lemony liquid into whatever you’re serving it in. Small ramekins are classic, pretty glasses are lovely, or even dainty teacups look super cute. You should get about 4 to 6 servings, all depending on how big your dishes are (and how generous you’re feeling!).
Step 6: The Big Chill
Gently, gently now, place your filled dishes into the fridge. They need to chill out, uncovered is fine (or if you’re worried about fridge smells and they’ve cooled down a bit, you can loosely cover them with cling film), for at least 4 hours. But, if you want the absolute best texture – we’re talking perfectly firm but still unbelievably creamy – I always, always go for 6 hours, or even better, let them have a good overnight beauty sleep in the fridge. This dessert is an absolute dream for making ahead! You’ll know your Lemon Posset is ready when it’s firm to a gentle touch, with just a little bit of a seductive wobble.
Recipes You May Like

Creative Serving Suggestions for Your Lemon Posset
Right then, the best part – making your Lemon Posset look as jaw-droppingly good as it tastes! Honestly, this dessert is like a beautiful blank canvas just waiting for your artistic touch. Here are a few of my favorite ways to dress it up:
- Simple & Chic: A single, perfect raspberry plonked right in the middle, or maybe a few blueberries scattered on top. A tiny mint leaf adds a lovely pop of green. This is my go-to for an effortlessly elegant Lemon Posset.
- Berry Blast: Before it’s fully chilled, or just before you serve it, why not gently spoon a little homemade berry compote over the top? Even a good quality store-bought one works wonders. That contrast of the sweet, slightly sharp berries against the tangy, creamy Lemon Posset? Oh, it’s heaven.
- Crunch Time: A little sprinkle of toasted flaked almonds, some roughly chopped pistachios, or even some crumbled-up shortbread biscuits just before serving adds such a great textural surprise.
- Extra Zest Appeal: A tiny, final grating of fresh lemon zest right over the top just before it heads to the table? It really brightens up the look and gives an amazing aromatic hit.
- Flower Power: If you’re feeling really fancy for a special occasion, a few carefully placed edible flowers (like pretty violas or borage) can make your Lemon Posset look like something out of a glossy magazine.
- For the Young (and Young at Heart!): A small, fun-shaped sugar cookie balanced cutely on the rim of the glass? Always a winner and guaranteed to get smiles.
- Summer Daydream: On a warm day, try serving your Lemon Posset with a little scoop of raspberry sorbet on the side. That cool contrast in temperatures and textures is just so refreshing.
Seriously, don’t be shy! The gorgeous, sunny yellow of the Lemon Posset is so naturally pretty that even the simplest little flourish will make it look absolutely fabulous.
Storing Tips for Your Delicious Lemon Posset
One of the many, many things I adore about a Lemon Posset is that it’s a total rockstar when it comes to making it ahead. Here’s the lowdown on how to store it so it stays tasting utterly amazing:
- In the Cool Comfort of Your Fridge: Once your possets are all set and lovely, you can cover them with cling film. If they’re fully chilled, you can press the film gently right onto the surface to stop a skin from forming, or just stretch it tautly over the top of the dish. They’ll keep like a dream in the fridge for up to 3-4 days. In fact, some people (myself included!) think the flavor actually gets even better by day two as everything melds together! This makes them absolutely perfect for planning ahead if you’ve got a dinner party or a little get-together on the horizon.
- So, Can You Freeze Lemon Posset? Honestly? I wouldn’t. The freezing and then thawing process can really mess with that signature silky, super-creamy texture. It can sometimes go a bit grainy or even a little watery, and nobody wants that for their Lemon Posset. It’s so ridiculously quick to whip up fresh, it’s usually best just to enjoy it without sending it to the freezer.
- Getting a Head Start (Ingredient Prep): While the dessert itself is a speedy Gonzales, you can totally get your lemon bits ready in advance. Zest and juice your lemons the day before if you like. Keep the juice in an airtight container in the fridge, and the zest in a little sealed bag. This can easily shave off those 10 minutes of prep on the day you’re actually making your possets. Every little helps, right?
Store it right, and your Lemon Posset will be a little pot of joy from the very first spoonful to the very last.
Why I’m Completely, Utterly Hooked on This Lemon Posset Recipe!
Okay, full confession time: this Lemon Posset recipe isn’t just a recipe in my kitchen; it’s pretty much an obsession, and I am SO incredibly excited for you to try it and fall in love too. It’s that magical mix of its bright, tangy, sophisticated flavor and that unbelievably smooth, almost cloud-like texture that just sings to me every single time. Plus, let’s be real, the fact that it needs so few ingredients and such a tiny amount of effort for a dessert that looks and tastes THIS good? It feels like one of those amazing kitchen secrets that’s just too good not to share. This Lemon Posset is my absolute champion when I want to impress people without secretly stressing out in the kitchen!
So, please, I’m practically begging you – do yourself a massive favor and whip up a batch of this glorious Lemon Posset. I pinky-promise you will not be disappointed. And when you do (because I know you will!), I’d be absolutely thrilled to hear how it turned out for you! Pop a comment below and tell me all about it – share your experience, any clever little twists you added, anything! Happy dessert making, my friends!
Lemon Posset
Easy Lemon Posset recipe for a creamy, tangy dessert. Simple steps for the best elegant treat. Try it!
Ingredients
- 600ml heavy cream (double cream)
- 150g granulated sugar
- 100ml fresh lemon juice (from about 3-4 medium lemons)
- 1 tablespoon finely grated lemon zest (from about 2 lemons)
- ½ teaspoon vanilla extract (optional),
- For Garnish (optional): Fresh berries ( raspberries or blueberries) and a sprig of mint or a dusting of powdered sugar
Instructions
Step 1: Lemon Prep!
Okay, first things first, let’s get our lemon power ready. Give those lemons a good wash. Using a microplane or the finest side of your grater, carefully zest about two of the lemons. You’re aiming for about a tablespoon of lovely, fragrant zest. Just the yellow stuff, remember! Then, squeeze those lemons until you’ve got 100ml of fresh juice. Pour this juice through a little fine-mesh sieve – this catches any pesky pips or bits of pulp. We want our final Lemon Posset to be as smooth as silk. Pop the zest and juice to one side. My go-to trick: I always roll my lemons firmly on the countertop before I juice them. I swear it helps get every last drop out!
Step 2: Cream and Sugar, Meet the Heat
Grab a medium-sized, heavy-bottomed saucepan. Using a good pan really does help stop the cream from sticking and making a fuss on the bottom. Pour in your lovely heavy cream and add the granulated sugar. Pop the pan over a medium heat. Now, gently stir, stir, stir with a whisk or a wooden spoon. This helps the sugar dissolve and stops a skin from trying to form on top of the cream. You want to bring this mixture to a gentle simmer – you’ll see little bubbles starting to form around the edges.
Step 3: The Magic Boil
Once your creamy, sugary mix is simmering away nicely and all that sugar has definitely dissolved (give the bottom of the pan a little feel with your spoon – no grittiness allowed!), let it boil gently. And I mean gently. Set a timer for exactly 3 minutes. Keep an eye on it and give it an occasional stir to make sure it doesn’t get any ideas about boiling over. This boiling step is super important; it’s what helps the cream thicken up just right and basically tells your Lemon Posset that it needs to set beautifully later. Little insider tip: I’ve seen some recipes say you only need to boil it for a minute, but honestly, after making this Lemon Posset more times than I can count, I’ve found that 3 minutes is the magic number for a consistently perfect, dreamy set with these amounts. Trust me on this one!
Step 4: Lemon Lovin’ Time
Okay, saucepan off the heat! Now it’s time to introduce your cream to its zesty best friend. Stir in the lemon zest you prepped earlier and that beautifully strained lemon juice. If you decided to go with vanilla extract, now’s its moment to shine too. Whisk everything together, gently but make sure it’s all mixed, for about 30 seconds. You’ll notice something pretty cool happen – the mixture will start to thicken up a tiny bit, almost straight away. That’s the acid in the lemon juice working its magic on the hot cream. It’s like a mini science experiment right in your kitchen! How cool is that?
Step 5: Strain for Smoothness (and Pour!)
For that truly professional, ultra-smooth, “did-you-buy-this?” kind of Lemon Posset, I really recommend straining the mixture one last time. Get a clean jug or bowl and pour the warm posset mixture through your fine-mesh sieve again. This will catch the zest (though, personally, I sometimes like leaving a few tiny flecks of zest in for looks – your call!) and any other little bits that might have formed. Now, from your jug, carefully pour this gorgeous, warm, lemony liquid into whatever you’re serving it in. Small ramekins are classic, pretty glasses are lovely, or even dainty teacups look super cute. You should get about 4 to 6 servings, all depending on how big your dishes are (and how generous you’re feeling!).
Step 6: The Big Chill
Gently, gently now, place your filled dishes into the fridge. They need to chill out, uncovered is fine (or if you’re worried about fridge smells and they’ve cooled down a bit, you can loosely cover them with cling film), for at least 4 hours. But, if you want the absolute best texture – we’re talking perfectly firm but still unbelievably creamy – I always, always go for 6 hours, or even better, let them have a good overnight beauty sleep in the fridge. This dessert is an absolute dream for making ahead! You’ll know your Lemon Posset is ready when it’s firm to a gentle touch, with just a little bit of a seductive wobble.
Notes
Nutrition Information
Yield
4-6 servingsAmount Per ServingCalories Approximately 350 calories per serving