Hey everyone! So, let’s chat about something I could probably eat every single week: Crispy Chicken Tenders. You know the kind – ridiculously crunchy on the outside, super juicy inside? Yeah, those. For the longest time, I was on a mission to perfect them at home. I swear, I tried SO many methods, wasted a fair bit of chicken (my smoke detector got a workout!), all chasing that perfect crunch. But finally, finally, I cracked the code. This recipe isn’t just good, it’s the one. It’s surprisingly simple, totally satisfying, and gives you genuinely amazing homemade chicken strips that’ll make you forget all about delivery. Seriously, get ready to make the best Crispy Chicken Tenders of your life!
Ingredients You’ll Need (Get Ready for Crunch!)
Okay, so what magic stuff do we need for this crunchfest? Good news – it’s mostly pantry staples you probably already have hanging around.
- The Star: About 1.5 pounds of boneless, skinless chicken breasts. Try and grab ones that look nice and plump. We’ll slice ’em into strips, maybe an inch wide-ish? Easy Button: Chicken tenderloins totally work too, and they save you some slicing time!
- The Tenderizer (aka Secret Weapon):
- 1 cup of Buttermilk. This stuff is magic for making chicken tender. No Buttermilk? No Problem! Just stir a tablespoon of lemon juice or plain white vinegar into 1 cup of regular milk and let it sit for 5 mins. Boom, instant buttermilk substitute.
- 1 tsp Salt
- 1/2 tsp Black Pepper
- 1 tsp Garlic Powder (because, duh, garlic!)
- Optional Heat: A pinch (or more!) of Cayenne Pepper – maybe 1/4 to 1/2 tsp if you like a little zing.
- The Crispy Coating Crew:
- 2 cups All-Purpose Flour. Our crunchy base camp.
- 1 cup Cornstarch. My little trick for making things extra crispy! Don’t skip this.
- 2 tsp Salt (Seasoning the coating is crucial!)
- 1 tsp Black Pepper
- 1 tsp Paprika – I love using smoked paprika here for that extra something-something.
- 1 tsp Garlic Powder
- 1/2 tsp Onion Powder
- The Glue:
- 2 Large Eggs, give ’em a good whisk.
- For Frying: You’ll need a decent amount of neutral oil – think Vegetable, Canola, or Peanut oil. About 3-4 cups should do it, enough so the chicken can float freely without sticking to the bottom of the pan.
Quick Tip: Don’t be shy with seasoning that flour mixture! It’s where a ton of the flavor lives. If you’re brave (and careful not to taste after raw chicken has touched it!), taste the tiniest pinch to check if it needs more salt or spice before you start breading.
Timing: Faster Than You Think!
You know what I love about making these Crispy Chicken Tenders? They actually come together pretty darn quick.
- Prep: 15 minutes max (Just slicing chicken, mixing stuff up)
- Chill Time: At least 30 minutes for the chicken to soak in that buttermilk goodness (longer is great if you have it, up to 4 hours refrigerated!)
- Cooking: Around 15-20 minutes, depending on your fryer setup (you’ll cook in batches)
- Total Time: Roughly 1 hour, give or take, including that minimum chill time.
Honestly, getting these incredible tenders on the table in about an hour feels way faster than most fried chicken adventures I’ve been on, and definitely beats waiting for delivery. It’s the perfect “I want something amazing but don’t want to spend all night cooking” kind of meal.
Step-by-Step Guide to Perfect Crispy Chicken Tenders
Alright, let’s do this! Follow along, and I promise you’ll end up with ridiculously good Crispy Chicken Tenders.
Step 1: Chicken Prep & Bath Time
First up, grab that chicken. Slice the breasts lengthwise into strips – aim for about an inch thick, but don’t stress if they’re not all perfectly identical twins. Toss the strips into a bowl. Pour the buttermilk right over them. Now sprinkle in the salt, pepper, garlic powder (and cayenne, if you’re feeling spicy). Give it all a good mix so every piece gets coated in that yummy marinade. Cover the bowl up nice and tight (plastic wrap works, or a lid if your bowl has one) and stash it in the fridge. Let it hang out for at least 30 minutes. Seriously, even that half-hour makes a difference. An hour or two? Even better for tenderness!
Step 2: Get Your Breading Station Ready
While the chicken’s chilling, let’s set up our breading assembly line. Grab three shallow-ish dishes or plates.
- Dish 1 (The Dry Mix): Dump in the flour, cornstarch, salt, pepper, paprika, garlic powder, and onion powder. Whisk it all together really well – you want those seasonings everywhere!
- Dish 2 (The Wet Mix): Crack the eggs into the second dish and beat them with a fork until they’re just combined. No need to go crazy here.
- Dish 3 (Clean Landing Zone/Optional Double Dip): You can either use Dish 1 again for the second flour dip (highly recommend!) or just have a clean plate or wire rack ready for the breaded chicken.
Line ’em up near your stove so you can go: Chicken -> Flour -> Egg -> Flour Again -> Clean Plate/Rack. Easy peasy.
Step 3: Breading Time! (Double Dip for Glory!)
This is where the crunch magic happens. Fish a few chicken strips out of the buttermilk marinade. Let the excess drip off for a second (but don’t wipe them dry!).
- Plop it into the seasoned flour (Dish 1). Roll it around, pat it gently – make sure it’s totally coated.
- Give it a quick swim in the beaten egg (Dish 2). Let any extra egg drip back into the dish.
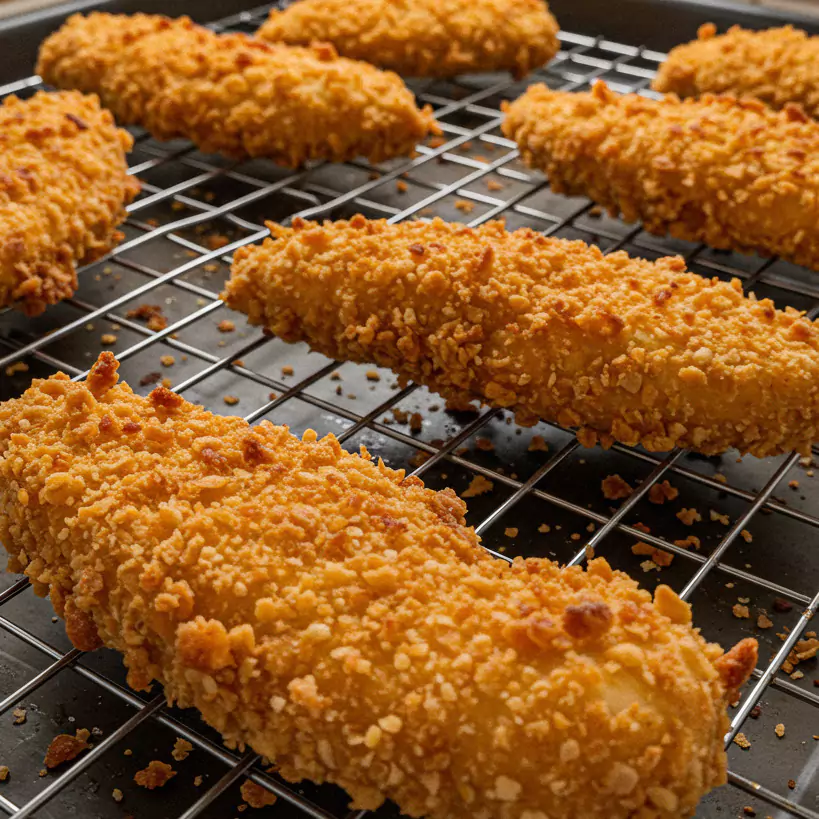
- Immediately put it back into the flour mix (Dish 1 or 3) for round two. This double coating is the secret handshake for truly Crispy Chicken Tenders. Really press that flour on there so it sticks like glue. Set the beautifully breaded tender onto your clean plate or, even better, a wire rack placed over a baking sheet (this stops the bottoms getting soggy while you bread the rest). Keep going until all your chicken is coated.
Step 4: Get That Oil Hot!
Time to fry! Pour your oil into a sturdy pot (a Dutch oven is perfect) or a deep, heavy skillet. You’re aiming for about 2-3 inches deep. Crank the heat up to medium-high. You want that oil to hit 350°F (175°C). A kitchen thermometer is honestly the best way to know for sure. No thermometer? Carefully drop a tiny piece of bread in; if it turns golden brown and sizzles happily in about 30-40 seconds, you’re likely good to go. Super Important: Keep an eye on that temperature! If the oil’s too cool, your chicken will be greasy. Too hot, and the outside cooks way too fast, leaving the inside raw. Adjust your stove heat as needed.
Step 5: Fry ‘Em Up!
Okay, deep breath – it’s go time! Gently lower a few pieces of breaded chicken into the hot oil using tongs or a slotted spoon. Don’t crowd the pan! Doing too many at once drops the oil temp way down, which is bad for crispiness. Fry them in batches for about 5-7 minutes, flipping them over halfway through, until they’re a gorgeous deep golden brown, look incredibly crispy, and are cooked all the way through (chicken needs to reach 165°F/74°C internally). Lift the cooked Crispy Chicken Tenders out of the oil, let the excess drip off for a moment, then transfer them to that wire rack over the baking sheet you prepared earlier. Let them hang out there while you fry the next batch. Resist the urge to put them straight onto paper towels – that traps steam and can make your hard-earned crunch go soft! Keep frying until all that amazing chicken is done.
Recipes You May Like

Serving Suggestions: Dip, Dunk, Devour!
YES! You did it! Now, how should you enjoy these masterpieces? Honestly, the sky’s the limit with these Crispy Chicken Tenders.
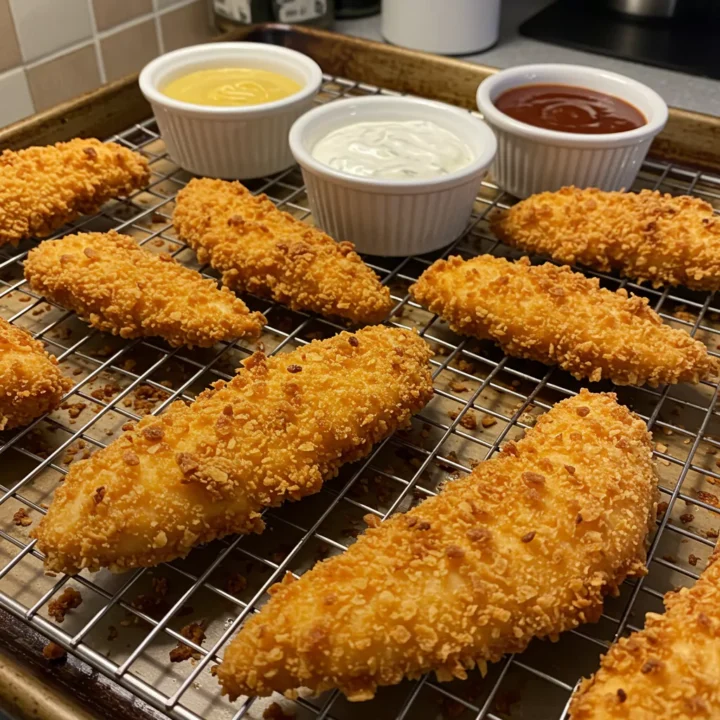
- The Classic: Fries. Gotta have fries, right? Regular or sweet potato, doesn’t matter. And sauces! Honey mustard is basically mandatory in my house, but BBQ, ranch, buffalo… go wild!
- Ultimate Comfort: Pile ’em next to some creamy mashed potatoes or a big scoop of mac and cheese. Oh man.
- Salad Upgrade: Slice ’em up and throw them on top of a big green salad. Instantly makes salad about 1000% more exciting.
- Wrap Star: Tuck these bad boys into a warm tortilla or pita with some crunchy lettuce, maybe some tomato, and a drizzle of your favorite creamy dressing. Lunch sorted.
- Kid Magnet: Kids LOVE these. Serve with ketchup (obviously), maybe some fruit, and call it a win.
My absolute fave way to serve ’em? A giant platter piled high, at least three different dipping sauces (gotta have options!), and a side of tangy coleslaw to cut through the richness. Simple, perfect, and everyone digs in.
Storing Tips for Your Crispy Chicken Tenders
If, by some miracle, you have leftovers (teach me your ways!), here’s how to handle them. While nothing beats fresh-out-the-fryer Crispy Chicken Tenders, you can definitely save them for later.
- Fridge: Let the tenders cool down completely on the wire rack first (this is key!). Then pop them in an airtight container. They’ll keep in the fridge for 3-4 days. Sometimes I stick a paper towel in the container to help soak up any moisture.
- Reheating (The Right Way!): Please, step away from the microwave unless you enjoy sadness. To get that crisp back, you need heat!
- Oven: Pop them on a wire rack on a baking sheet in a preheated 400°F (200°C) oven for 10-15 minutes. They’ll crisp right back up!
- Air Fryer: Even better! Set your air fryer to 375°F (190°C). A few minutes (maybe 5-8?), flipping once, and they’ll be almost as good as new. Work in a single layer so the air can circulate.
- Freezer: Yep, you can freeze ’em too! Cool completely, lay them on a baking sheet in the freezer until solid, then transfer to a freezer bag. Reheat straight from frozen using the oven or air fryer methods, just add a few extra minutes.
Why I’m Completely Hooked on This Recipe!
Look, I’m not exaggerating when I say this recipe is a staple. Why? Because these Crispy Chicken Tenders just deliver, every single time. You get that loud CRUNCH, then perfectly juicy chicken, and the seasoning is just right. They feel like a special treat, but they’re honestly not hard to pull off, even on a busy weeknight.
There’s something so satisfying about watching my family (or friends!) devour a plate of these. No leftovers is the biggest compliment, right? Plus, making them myself means I know exactly what went into them – no mystery ingredients like some takeout spots.
Pulling a batch of these homemade Crispy Chicken Tenders out of the fryer, all golden and perfect… it just makes me happy. That first bite is pure bliss.
So, go on, give it a shot! Make these Crispy Chicken Tenders and see for yourself. I bet you’ll be hooked too. Definitely drop a comment below and tell me how they turned out! Did you stick to the recipe, or did you add your own twist? What are your must-have dipping sauces? Can’t wait to hear all about it! Happy frying!
Crispy Chicken Tenders
Learn how to make the BEST homemade Crispy Chicken Tenders! Super easy recipe for incredibly crunchy, juicy results every time. Try it!
Ingredients
- 1.5 lbs boneless, skinless chicken breasts (or tenderloins), cut into 1-inch strips
- 1 cup Buttermilk (or milk + 1 tbsp lemon juice/vinegar)
- 1 tsp Salt (for marinade)
- 1/2 tsp Black Pepper (for marinade)
- 1 tsp Garlic Powder (for marinade)
- 1/4 - 1/2 tsp Cayenne Pepper (optional, for marinade)
- 2 cups All-Purpose Flour
- 1 cup Cornstarch
- 2 tsp Salt (for coating)
- 1 tsp Black Pepper (for coating)
- 1 tsp Paprika (smoked paprika recommended)
- 1 tsp Garlic Powder (for coating)
- 1/2 tsp Onion Powder
- 2 Large Eggs, beaten
- 3-4 cups Neutral Frying Oil (Vegetable, Canola, or Peanut)
Instructions
Step 1: Chicken Prep & Bath Time
First up, grab that chicken. Slice the breasts lengthwise into strips – aim for about an inch thick, but don’t stress if they’re not all perfectly identical twins. Toss the strips into a bowl. Pour the buttermilk right over them. Now sprinkle in the salt, pepper, garlic powder (and cayenne, if you’re feeling spicy). Give it all a good mix so every piece gets coated in that yummy marinade. Cover the bowl up nice and tight (plastic wrap works, or a lid if your bowl has one) and stash it in the fridge. Let it hang out for at least 30 minutes. Seriously, even that half-hour makes a difference. An hour or two? Even better for tenderness!
Step 2: Get Your Breading Station Ready
While the chicken’s chilling, let’s set up our breading assembly line. Grab three shallow-ish dishes or plates.
- Dish 1 (The Dry Mix): Dump in the flour, cornstarch, salt, pepper, paprika, garlic powder, and onion powder. Whisk it all together really well – you want those seasonings everywhere!
- Dish 2 (The Wet Mix): Crack the eggs into the second dish and beat them with a fork until they’re just combined. No need to go crazy here.
- Dish 3 (Clean Landing Zone/Optional Double Dip): You can either use Dish 1 again for the second flour dip (highly recommend!) or just have a clean plate or wire rack ready for the breaded chicken.
Line ’em up near your stove so you can go: Chicken -> Flour -> Egg -> Flour Again -> Clean Plate/Rack. Easy peasy.
Step 3: Breading Time! (Double Dip for Glory!)
This is where the crunch magic happens. Fish a few chicken strips out of the buttermilk marinade. Let the excess drip off for a second (but don’t wipe them dry!).
- Plop it into the seasoned flour (Dish 1). Roll it around, pat it gently – make sure it’s totally coated.
- Give it a quick swim in the beaten egg (Dish 2). Let any extra egg drip back into the dish.
- Immediately put it back into the flour mix (Dish 1 or 3) for round two. This double coating is the secret handshake for truly Crispy Chicken Tenders. Really press that flour on there so it sticks like glue. Set the beautifully breaded tender onto your clean plate or, even better, a wire rack placed over a baking sheet (this stops the bottoms getting soggy while you bread the rest). Keep going until all your chicken is coated.
Step 4: Get That Oil Hot!
Time to fry! Pour your oil into a sturdy pot (a Dutch oven is perfect) or a deep, heavy skillet. You’re aiming for about 2-3 inches deep. Crank the heat up to medium-high. You want that oil to hit 350°F (175°C). A kitchen thermometer is honestly the best way to know for sure. No thermometer? Carefully drop a tiny piece of bread in; if it turns golden brown and sizzles happily in about 30-40 seconds, you’re likely good to go. Super Important: Keep an eye on that temperature! If the oil’s too cool, your chicken will be greasy. Too hot, and the outside cooks way too fast, leaving the inside raw. Adjust your stove heat as needed.
Step 5: Fry ‘Em Up!
Okay, deep breath – it’s go time! Gently lower a few pieces of breaded chicken into the hot oil using tongs or a slotted spoon. Don’t crowd the pan! Doing too many at once drops the oil temp way down, which is bad for crispiness. Fry them in batches for about 5-7 minutes, flipping them over halfway through, until they’re a gorgeous deep golden brown, look incredibly crispy, and are cooked all the way through (chicken needs to reach 165°F/74°C internally). Lift the cooked Crispy Chicken Tenders out of the oil, let the excess drip off for a moment, then transfer them to that wire rack over the baking sheet you prepared earlier. Let them hang out there while you fry the next batch. Resist the urge to put them straight onto paper towels – that traps steam and can make your hard-earned crunch go soft! Keep frying until all that amazing chicken is done.