Hey everyone! So, picture this: a tiny, sun-drenched taverna on a Greek island. That’s where I first fell head-over-heels for a dish similar to these Greek Stuffed Onions. It wasn’t just food; it was like a warm hug from the Mediterranean itself! The sweetness of those tender, baked onions, packed with a ridiculously flavorful herby rice filling… chef’s kiss! Naturally, I had to try and recreate that magic back home. After, let’s just say, several very dedicated (and delicious!) trial-and-error sessions in my kitchen, fiddling with the herbs and getting the lemon just right, I’ve finally nailed this vegan Greek Stuffed Onions recipe. And guess what? It’s way easier than you might think, tastes like a little piece of heaven, and I’m SO excited to share it with you. Get ready, because these might just become your new obsession!
Ingredients for Your Amazing Greek Stuffed Onions
Alright, let’s talk ingredients. For these Yemistes Kremmydia (that’s the fancy Greek name, sounds cool, right?), you’ll want to gather these goodies. Don’t worry, nothing too wild, and I’ll give you some swap ideas too!
For the Onions (Our Golden Globes of Goodness!):
- Big Ol’ Yellow or White Onions: You’ll need 4 or 5. Go for ones that feel nice and heavy for their size – they’ll be easier to hollow out and look gorgeous.
- Good Olive Oil: About 2-3 tablespoons of your best extra virgin for drizzling. You know, the good stuff!
- Vegetable Broth (or just water): About 1 cup (240ml) to help things get steamy in the baking dish.
For That Irresistible Herby Rice Filling:
- Long-Grain White Rice: 1 cup (about 200g), uncooked. I find this works best, but Arborio is nice if you like things a bit creamier.
- More Olive Oil!: 1/4 cup (60ml). Seriously, good olive oil is your best friend in Greek cooking.
- The Onion Innards: Don’t throw away the bits you scoop out! Finely chop them up – waste not, want not, and it’s pure flavor.
- Fresh Parsley: A good handful, about 1/2 cup, finely chopped. It makes everything taste so fresh!
- Fresh Dill: About 1/4 cup, finely chopped. If you’ve never cooked much with dill, you’re in for a treat – it’s SO Greek.
- Fresh Mint: Around 2 tablespoons, finely chopped. A little bit adds such a lovely, bright surprise.
- Tomato Paste: 2 tablespoons for that rich, tomatoey depth. Or, if you have a lovely ripe tomato, grating about 1/2 cup of that is fantastic.
- Pine Nuts: 2 tablespoons. These are optional, but I LOVE the little buttery crunch they add. Toast ’em a bit if you’re feeling fancy.
- Currants or Raisins: Another 2 tablespoons, also optional. I know, fruit in a savory dish? Trust me, many traditional Greek recipes have this little touch of sweetness, and it’s divine with the onions.
- Lemon Juice: From 1 whole juicy lemon (so, about 3-4 tablespoons). Freshly squeezed makes all the difference, really.
- Vegetable Broth: Another 1/2 cup (120ml) for the filling.
- Sea Salt: About 1 teaspoon, but taste as you go.
- Freshly Ground Black Pepper: About 1/2 teaspoon – or more if you like a peppery kick!
- A Little Spice (If You Dare!): A tiny pinch of cinnamon or a whisper of allspice can really warm things up and give it an authentic Greek vibe. Sometimes I sneak in some sweet paprika too!
Quick Swaps & Ideas:
- Rice Check: Brown rice works; just know it might take a tad longer to cook and need a bit more liquid. Quinoa is a cool gluten-free option, but it’ll have a different vibe.
- Herb Help: Fresh is best, especially the parsley! But if you must use dried dill or mint, use about a third of the fresh amount (so, roughly 1.5 teaspoons dried dill, 2 teaspoons dried mint).
- Nuts & Fruit: No pine nuts? No worries. Chopped walnuts or even sunflower seeds could work. Not a fan of currants? Just leave them out for a totally savory bite.
How Long Will This Greek Stuffed Onions Adventure Take?
Okay, let’s be real about timing for these yummy Greek Stuffed Onions. It’s not a 20-minute meal, but oh, is it worth it!
- Getting Your Hands Dirty (Prep Time): Give yourself a good 40-45 minutes. This is when you’ll hollow out those onions (it’s easier than it sounds, promise!) and mix up that incredible filling. Put on some good music, maybe pour a glass of something nice – make it fun! I find it pretty therapeutic.
- Oven Time (Cooking Time): These beauties will need about 50-60 minutes in the oven. Your kitchen is going to smell AMAZING. I’ve found this is a bit quicker than some old-school recipes that have you simmering onions for ages.
- From Start to Yum (Total Time): You’re looking at roughly 1 hour 30 minutes to 1 hour 45 minutes. Perfect for a lazy Sunday afternoon, a special weeknight when you want to treat yourself, or when you really want to wow some dinner guests without pulling your hair out.
Your Step-by-Step Guide to Amazing Greek Stuffed Onions
Ready to make some magic? Let’s walk through it. I’ve got a few little tips tucked in here that I’ve picked up along the way for making these Greek Stuffed Onions extra special.
Step 1: Onion Prep Time!
First up, get that oven preheating to 375°F (190°C). Grab your onions, peel ’em, and slice off the top (the stem bit), maybe about 1/2 an inch. Then, just trim a tiny sliver from the root end so they can stand up nice and proud in your baking dish – but not too much, or your filling will make a run for it! Now for the fun part: using a small spoon (a grapefruit spoon or a melon baller are my secret weapons here!), carefully scoop out the insides of each onion. You want to leave about 2 or 3 outer layers to make a sturdy little bowl. Think mini pumpkin carving! And whatever you do, don’t chuck those onion insides – chop them up finely; they’re going straight into our filling for max flavor! Pop your hollowed-out onion shells into a baking dish that fits them snugly.
Step 2: Get Those Aromas Going
In a decent-sized skillet or pan, warm up that 1/4 cup of olive oil over medium heat. Toss in your chopped onion innards and let them soften up and get a little translucent, maybe 5-7 minutes. If you’re using pine nuts, throw them in for the last couple of minutes of sautéing to get them a little toasty and fragrant – game changer!
Step 3: Building That Incredible Rice Filling
Okay, to that pan with the soft onions, add your uncooked rice. Stir it around for a minute or two so the grains get all friendly with the oil and toast up a bit – this little step really deepens the flavor. Now, pile in the fresh parsley, dill, mint, the tomato paste (or your grated fresh tomato), those optional currants/raisins, the 1/2 cup of veg broth, all that lovely lemon juice, sea salt, and pepper. If you’re feeling adventurous with a pinch of cinnamon or allspice, now’s the time! Give it all a really good mix. Let it bubble away gently for about 5 minutes, just until some of that liquid has been soaked up. The rice will still be quite firm, and that’s perfect. This little pre-cook helps it get perfectly tender inside your Greek Stuffed Onions.
Step 4: Stuff ‘Em Up!
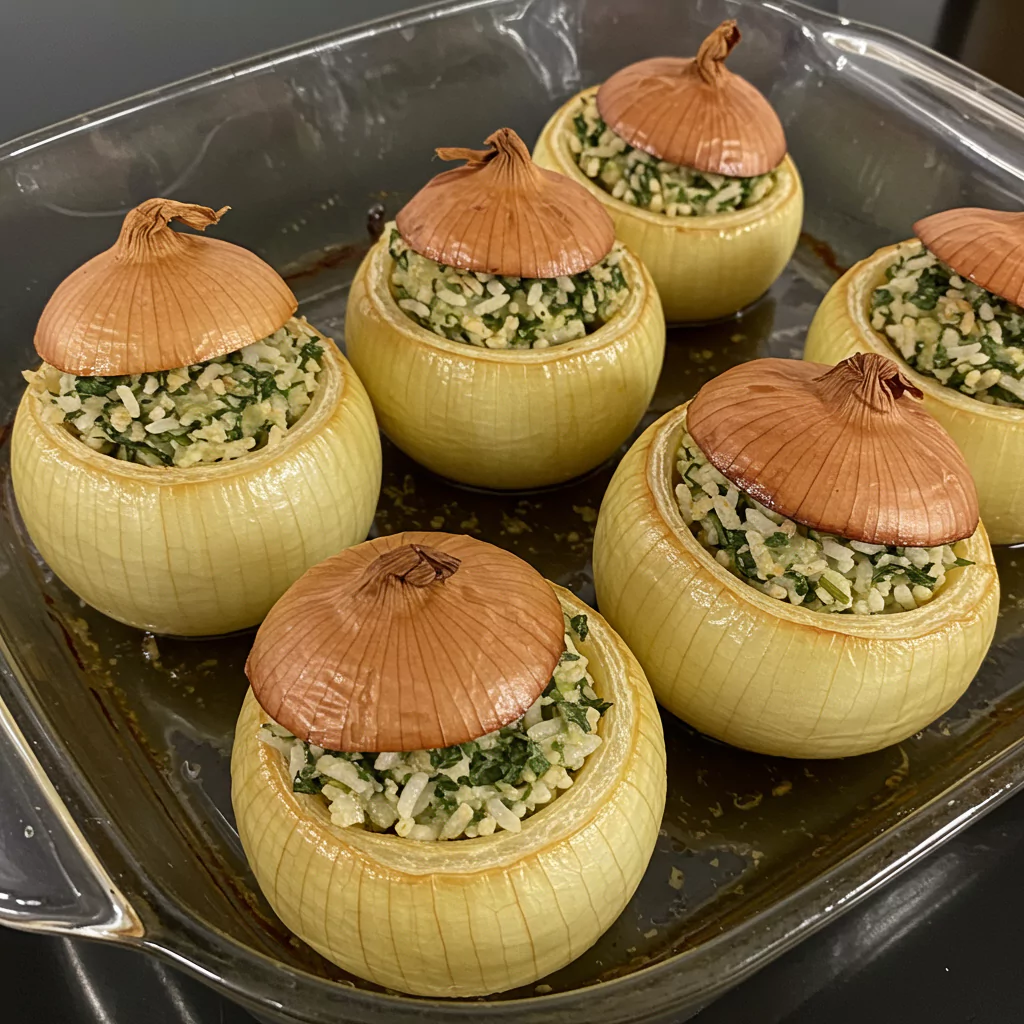
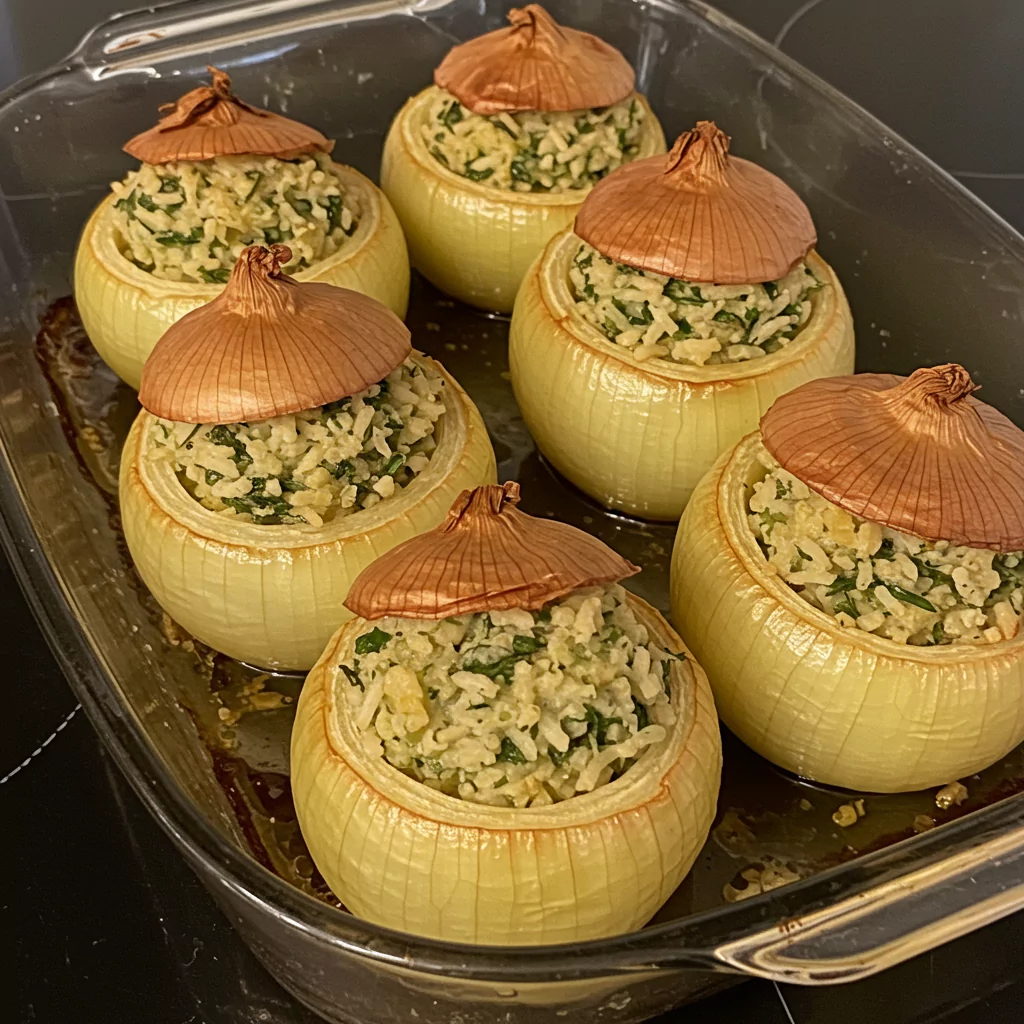
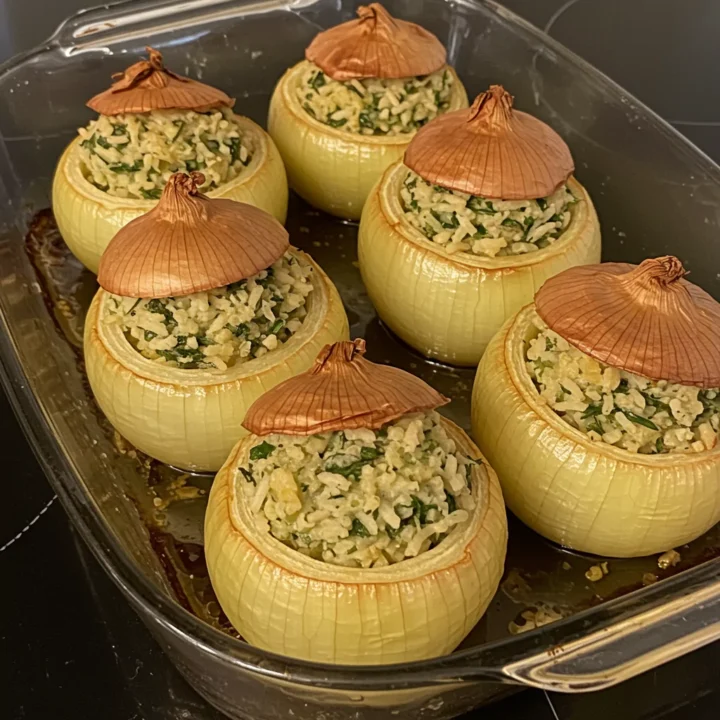
Time to fill those onion shells! Spoon the rice mixture into each one. Don’t pack it down super tight, as the rice needs a little room to fluff up as it cooks. Be generous – if you have a bit extra mounding on top, that’s great! Those crispy top bits are the best.
Step 5: Into the Oven They Go
Drizzle your stuffed onions with those last 2-3 tablespoons of lovely olive oil. Pour the 1 cup of vegetable broth (or water) into the bottom of the baking dish, around the onions – this creates a bit of steam and stops everything from drying out. Cover the whole dish tightly with foil. Now, into that preheated oven for 30 minutes.
Step 6: The Grand Finale – Golden & Glorious!
After 30 minutes, carefully take off the foil. Let them bake for another 20-30 minutes. You’re looking for the onions to be super tender, a little bit golden on top, and for that rice filling to be perfectly cooked through. If they start looking a bit too tanned too quickly, you can just lay the foil loosely back on top. You’ll know your Greek Stuffed Onions are done when a knife slides easily into the onion and the rice is fluffy. Oh, and try to let them sit for about 10 minutes after they come out of the oven – it’s hard, I know, but it lets all those amazing flavors really settle in.
Recipes You May Like
How to Serve Your Stunning Greek Stuffed Onions
Okay, your kitchen smells incredible, and you’ve got these gorgeous Greek Stuffed Onions ready. But how to serve them? Oh, the possibilities!
- Let Them Shine as the Main Event: Honestly, these are so satisfying they can totally be the star of a vegan dinner. I love them with a big dollop of creamy vegan tzatziki (that cucumber-garlic dip – you can find some great dairy-free yogurts for this!) or just some plain plant-based yogurt with a squeeze of lemon and a sprinkle of dill. A classic Greek salad on the side (tomatoes, cucumbers, olives, maybe some vegan feta if you can find a good one) is just perfection.
- Meze Madness: Imagine these beauties as part of a big Greek meze spread! Think dolmades (stuffed grape leaves), hummus, warm pita bread, olives, maybe some roasted red peppers. Your friends will think you’re a culinary genius.
- Simple & Satisfying Sides: Some lemony roasted potatoes or a bit of fluffy quinoa are fantastic alongside. Even a simple green salad with a light vinaigrette works wonders.
- A Little Extra Flair: A tiny sprinkle of fresh parsley or dill right before you serve them just brightens everything up. And always, always have a few lemon wedges on the side for anyone who wants an extra zing (that’s usually me!).
- Warm or Not-So-Warm: They are absolutely heavenly straight from the oven, but these Greek Stuffed Onions are also surprisingly delicious at room temperature. This makes them brilliant for picnics, potlucks, or if you just want to get ahead for a dinner party.
Pro tip from my house: make more than you think you need. They vanish. Quickly.
Storing Your Precious Greek Stuffed Onions
If, by some miracle, you have leftovers (or you’re being super organized and prepping ahead), here’s how to keep your Greek Stuffed Onions happy:
- In the Fridge: Let them cool down completely on the counter first. Then, pop them into an airtight container. They’ll be great in the fridge for 3-4 days. And honestly? The flavors get even better the next day.
- Reheating Gently: The oven is your best bet to bring them back to life. A gentle reheat at around 325°F (160°C) for 15-20 minutes usually does the trick. Covering them with foil again will stop them from drying out. You can microwave them, but the oven keeps the texture nicer.
- Can You Freeze Them?: You can, but just a heads up, the onions themselves can get a bit softer after thawing. The filling is totally fine, though! If you do freeze, let them cool completely, maybe wrap each one in plastic wrap, then into a freezer-safe bag or container. Thaw them in the fridge overnight before reheating.
- Prep-Ahead Heroics: This is where you can really save some time!
- Onion Shells: You can totally peel and scoop out your onions the day before. Just keep them in an airtight container in the fridge.
- Rice Filling: Same goes for the filling! Make it a day ahead, cover it, and chill.
- Then, when you’re ready, it’s just a quick assembly job before baking. Future you will be very grateful for these perfectly prepped Greek Stuffed Onions components!
A little planning means you can enjoy these tasty Greek Stuffed Onions with less fuss!
Okay, I’m Officially Obsessed With These Greek Stuffed Onions (And You Will Be Too!)
Can you tell I’m a bit smitten with these Greek Stuffed Onions? It’s just one of those recipes that feels like pure comfort and sunshine all rolled into one. I absolutely love how a simple, everyday onion can turn into something so incredibly sweet and luscious, especially when it’s cuddling that savory, herby, lemony rice. It’s proof that you don’t need a million fancy ingredients to make something truly special. Plus, let’s be honest, they look pretty darn impressive sitting on a plate, like little edible jewels.
I genuinely hope you give these Greek Stuffed Onions a whirl in your own kitchen. They really are a joy to make and even more of a joy to eat. And when you do, please, please pop back here and leave a comment! I’d be thrilled to hear how they turned out for you. Did you put your own spin on them? What did you serve them with? Spill the beans!
Happy cooking, everyone!
Greek Stuffed Onions
Delicious Greek Stuffed Onions: An easy vegan recipe with herby rice. Perfect Mediterranean baked dish. Try this authentic flavor today!
Ingredients
- 4-5 large Yellow or White Onions
- 2-3 tbsp Extra Virgin Olive Oil
- 1 cup (240ml) Vegetable Broth (or water)
- 1 cup (approx. 200g) Long-Grain White Rice, uncooked
- 1/4 cup (60ml) Extra Virgin Olive Oil
- Reserved Scooped Onion, finely chopped
- 1/2 cup Fresh Parsley, finely chopped
- 1/4 cup Fresh Dill, finely chopped
- 2 tbsp Fresh Mint, finely chopped
- 2 tbsp Tomato Paste (or 1/2 cup grated fresh tomato)
- 2 tbsp Pine Nuts (optional)
- 2 tbsp Currants or Raisins (optional)
- Juice of 1 large Lemon (approx. 3-4 tbsp)
- 1/2 cup (120ml) Vegetable Broth
- 1 tsp Sea Salt (or to taste)
- 1/2 tsp Freshly Ground Black Pepper (or to taste)
- Optional: Pinch of cinnamon or allspice
Instructions
Step 1: Onion Prep Time!
First up, get that oven preheating to 375°F (190°C). Grab your onions, peel ’em, and slice off the top (the stem bit), maybe about 1/2 an inch. Then, just trim a tiny sliver from the root end so they can stand up nice and proud in your baking dish – but not too much, or your filling will make a run for it! Now for the fun part: using a small spoon (a grapefruit spoon or a melon baller are my secret weapons here!), carefully scoop out the insides of each onion. You want to leave about 2 or 3 outer layers to make a sturdy little bowl. Think mini pumpkin carving! And whatever you do, don’t chuck those onion insides – chop them up finely; they’re going straight into our filling for max flavor! Pop your hollowed-out onion shells into a baking dish that fits them snugly.
Step 2: Get Those Aromas Going
In a decent-sized skillet or pan, warm up that 1/4 cup of olive oil over medium heat. Toss in your chopped onion innards and let them soften up and get a little translucent, maybe 5-7 minutes. If you’re using pine nuts, throw them in for the last couple of minutes of sautéing to get them a little toasty and fragrant – game changer!
Step 3: Building That Incredible Rice Filling
Okay, to that pan with the soft onions, add your uncooked rice. Stir it around for a minute or two so the grains get all friendly with the oil and toast up a bit – this little step really deepens the flavor. Now, pile in the fresh parsley, dill, mint, the tomato paste (or your grated fresh tomato), those optional currants/raisins, the 1/2 cup of veg broth, all that lovely lemon juice, sea salt, and pepper. If you’re feeling adventurous with a pinch of cinnamon or allspice, now’s the time! Give it all a really good mix. Let it bubble away gently for about 5 minutes, just until some of that liquid has been soaked up. The rice will still be quite firm, and that’s perfect. This little pre-cook helps it get perfectly tender inside your Greek Stuffed Onions.
Step 4: Stuff ‘Em Up!
Time to fill those onion shells! Spoon the rice mixture into each one. Don’t pack it down super tight, as the rice needs a little room to fluff up as it cooks. Be generous – if you have a bit extra mounding on top, that’s great! Those crispy top bits are the best.
Step 5: Into the Oven They Go
Drizzle your stuffed onions with those last 2-3 tablespoons of lovely olive oil. Pour the 1 cup of vegetable broth (or water) into the bottom of the baking dish, around the onions – this creates a bit of steam and stops everything from drying out. Cover the whole dish tightly with foil. Now, into that preheated oven for 30 minutes.
Step 6: The Grand Finale – Golden & Glorious!
After 30 minutes, carefully take off the foil. Let them bake for another 20-30 minutes. You’re looking for the onions to be super tender, a little bit golden on top, and for that rice filling to be perfectly cooked through. If they start looking a bit too tanned too quickly, you can just lay the foil loosely back on top. You’ll know your Greek Stuffed Onions are done when a knife slides easily into the onion and the rice is fluffy. Oh, and try to let them sit for about 10 minutes after they come out of the oven – it’s hard, I know, but it lets all those amazing flavors really settle in.
Notes
Nutrition Information
Yield
4-5 servingsAmount Per ServingCalories Approximately 400 calories per serving.