My Epic Kitchen Fail That Accidentally Birthed These Strawberry Cheesecake Crunch Bites!
Oh myy, you guys, have I got a story for YOU. So, picture this: me, trying to be all fancy, promising to bring this amazing no-bake strawberry cheesecake to a family thing. I was feeling pretty pleased with myself, you know? Then BAM! Total cheesecake catastrophe. It just… wouldn’t… set. I had that moment of sheer panic, heart sinking, thinking, “Oh no, what have I DONE?!” We’ve all been there, right? That split second where you just want the floor to swallow you up. But then, a little spark! Instead of totally losing it, I thought, “Hang on a sec… this filling is still crazy delicious.” So, I just started rolling it into little balls – kinda like a Hail Mary pass – and then dunked them in graham cracker crumbs. And you will NOT believe it, but these little Strawberry Cheesecake Crunch Bites were a gazillion times better than my original, slightly tragic cheesecake attempt! My family went absolutely nuts for them! Took me a couple more tries, maybe four (hey, recipe testing is delicious work!), to get that strawberry zing just right in every single bite and the perfect creamy-to-crunchy ratio. Now? These are my secret weapon. They’re just SO good – like all the best bits of a strawberry cheesecake packed into one perfect, pop-in-your-mouth, crunchy little bomb of happiness.
Your Grocery List for These Amazing Strawberry Cheesecake Crunch Bites (Don’t Worry, It’s Easy!)
Alright, besties, let’s talk ingredients for these little drops of pure joy. Here’s what you gotta grab. And hey, I’ve got your back with some easy swaps if your pantry’s looking a bit bare in places!
- For That Luscious, Creamy Cheesecake Heart:
- Cream Cheese: You’ll need two of those 8-ounce blocks. And for the love of all things creamy, let ’em sit out on the counter for a bit to get to room temp. Seriously, it’s the secret handshake for a smooth filling without any annoying lumps. If you’re feeling a bit virtuous, Neufchâtel cheese is okay, but just know it won’t be quite as rich and dreamy.
- Fresh Strawberries: A good cup, chopped up nice and tiny. We want those little pockets of strawberry goodness everywhere! Hot tip: if you can find freeze-dried strawberries (maybe 1/2 cup, crushed up), they give this INSANE strawberry flavor punch and help keep things from getting too wet.
- Granulated Sugar: About 3/4 cup. But listen, you do you! If you like it sweeter, add a touch more. If not, dial it back. Some folks swear by powdered sugar for an even smoother vibe – if that’s you, maybe use a smidge less, like 2/3 of a cup.
- Vanilla Extract: A teaspoon of the real deal, please! That pure vanilla flavor is just chef’s kiss.
- Lemon Juice: Just a tablespoon – fresh is best if you’ve got it! It just makes everything taste brighter and happier.
- For That “Oh-My-Gosh” Crunchy Outside:
- Graham Crackers: We’re talking 1.5 cups of crumbs here, which is about 10-12 of those full cracker sheets. You can whiz ’em in a food processor, or, my personal favorite stress-relief method: pop ’em in a bag and go to town with a rolling pin! Digestive biscuits or even vanilla wafers work great too if graham crackers aren’t your jam.
- Unsalted Butter: Six glorious tablespoons, melted down ’til it’s all golden and lovely. This is the glue that holds our crunchy dreams together.
- Sugar: Another 2 tablespoons – totally optional, but I’m a sucker for that extra hint of sweetness in the crust.
- For Making Them Extra Pretty & Even MORE Delicious (Because Why Not?!):
- White Chocolate: Grab about 4 ounces. Melting this down for a drizzle? Game. Changer.
- Extra Graham Cracker Crumbs: You know, for a little sprinkle-sprinkle.
- Teeny Tiny Strawberry Slices or a Pinch of Crushed Freeze-Dried Strawbs: Makes ’em look super cute and adds another flavor pop.
- Sprinkles! Because honestly, who doesn’t love sprinkles? They just make everything more fun.

Time Check: How Long ‘Til We’re Eating Strawberry Cheesecake Crunch Bites?
Okay, okay, the big question: how long ’til these Strawberry Cheesecake Crunch Bites are ready to be devoured? You’re gonna love this: they’re way faster than you’d imagine, especially compared to baking a whole cheesecake, which can feel like it takes a lifetime (and who has time for that on a whim?!).
- Getting Your Hands Messy (Prep Time): Give yourself about 25-30 minutes. This covers chopping those juicy strawberries, mixing up that dreamy filling, and getting your crumb situation sorted. If you’re making your own graham cracker crumbs, maybe add 5 more minutes – no stress, enjoy the process!
- The Chill Factor (Super Important!): At least 2 hours in the fridge. I know, waiting is the WORST, but this is where the magic happens. The bites get firm enough to roll without turning into a sticky mess, and all those yummy flavors get to meld and become best friends. Truth be told, I often make the filling the night before. They’re even better the next day, I swear!
- The Fun Part – Rolling & Coating: This bit is quick, maybe 15-20 minutes. Pop on some music!
- So, All In All?: You’re looking at roughly 2 hours and 45 minutes from start to finish, and most of that is just chillin’ (for the bites, not you… unless you want to!). That’s a massive win for a dessert that looks and tastes this good. These no-bake Strawberry Cheesecake Crunch Bites are basically your secret weapon for when you need something amazing, like, now.
Your Super Simple, No-Fuss Guide to Making Strawberry Cheesecake Crunch Bites
Alright, let’s DO this! Grab your favorite apron (or don’t, I’m not judging!), and let’s whip up these incredible Strawberry Cheesecake Crunch Bites. It’s so much easier than you think, promise!
Step 1: Let’s Make That Creamy Strawberry Filling!
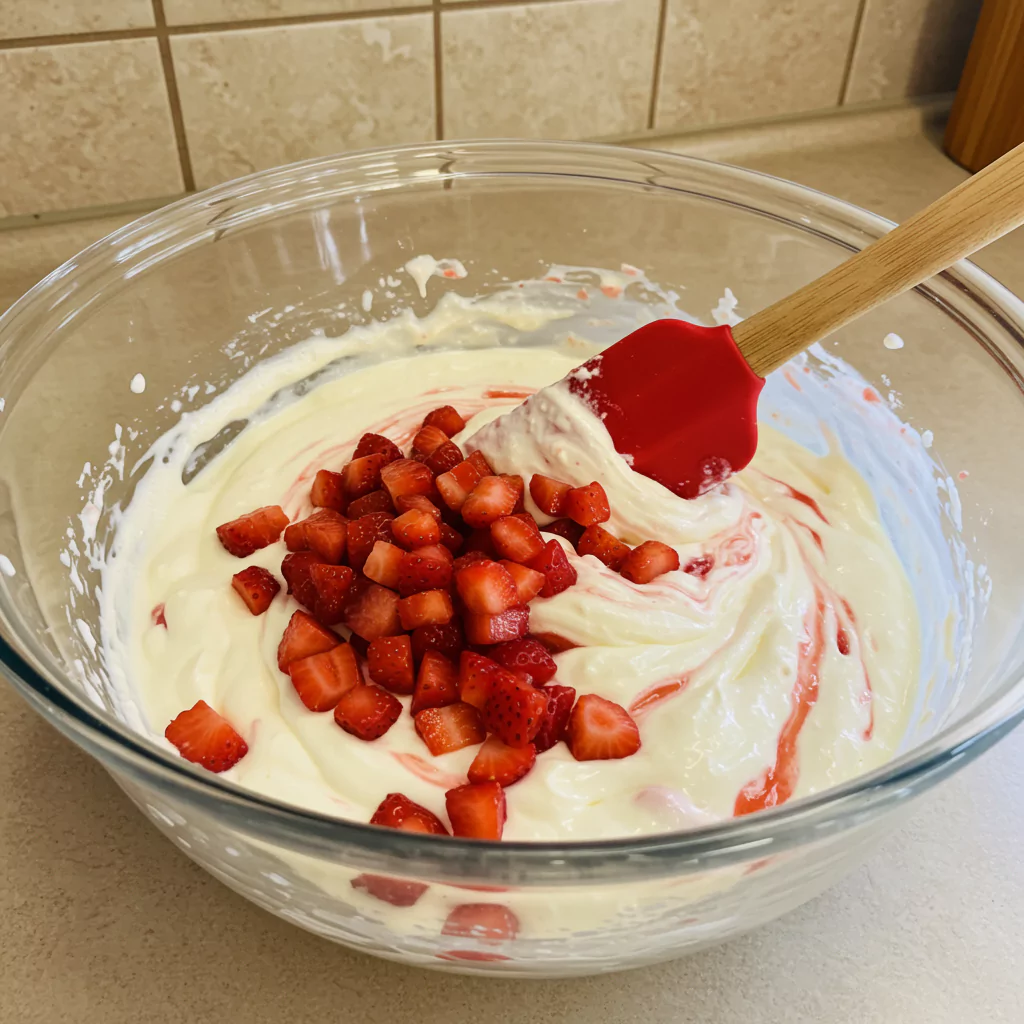
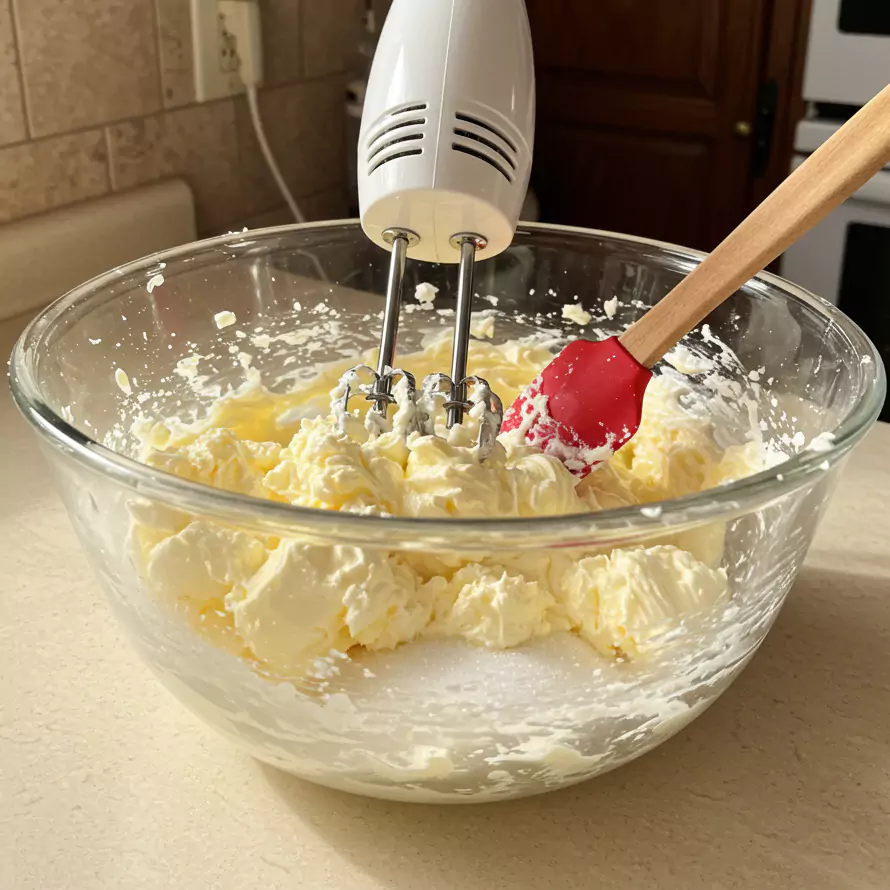
In a decent-sized bowl, toss in your softened cream cheese. Now, grab your electric mixer (or a whisk and some elbow grease!) and beat it on medium speed ’til it’s all lovely and smooth – probably 2-3 minutes. Don’t forget to scrape down the sides of the bowl a few times so no cream cheese gets left behind! Now, slowly add your sugar and keep that mixer going until it’s all light and fluffy. Next up, stir in your vanilla and that zingy lemon juice. And finally, the star: gently fold in those finely diced fresh strawberries. Try not to get too aggressive with the mixing here; we want pretty little pieces of strawberry, not strawberry mush. Quick tip from my kitchen fails: If your strawberries are super juicy, just give them a little pat with a paper towel after you dice them. It stops the filling from getting a bit too watery.
Step 2: First Chill Sesh
Cover that bowl up (plastic wrap, a plate, whatever works) and let it hang out in the fridge for at least an hour. This little rest helps the mixture firm up just enough to make it way less messy to scoop later. Perfect time to make your crunchy coating if you haven’t already!
Step 3: Time to Get Crumbly!
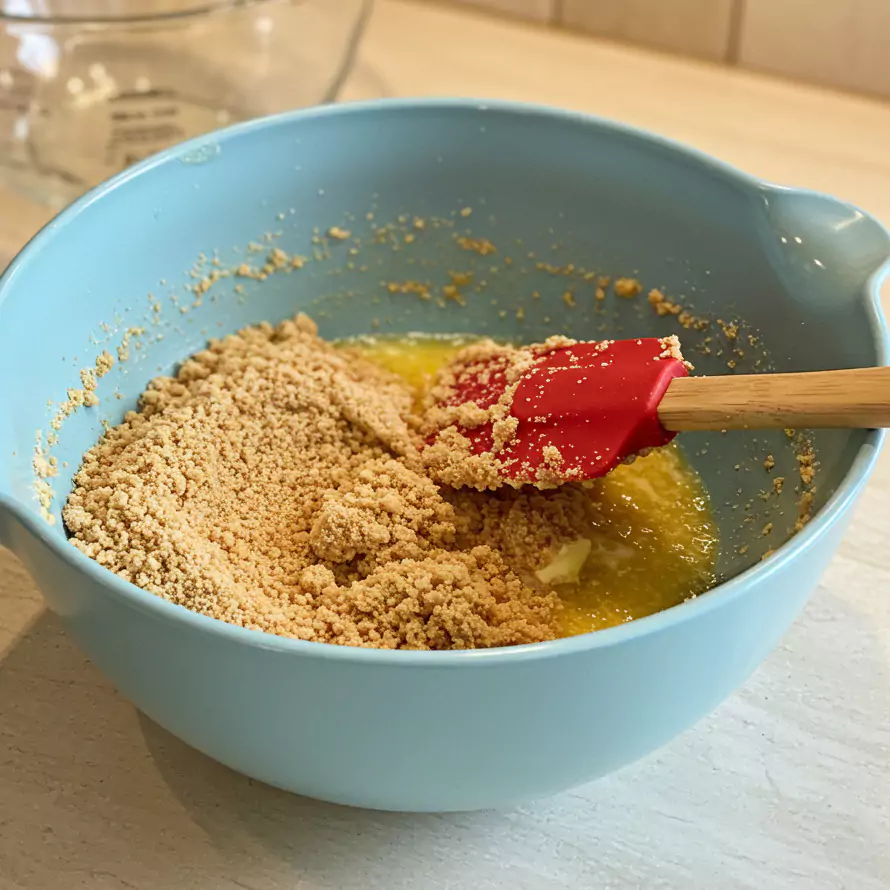
In another bowl, mix up your graham cracker crumbs, that gorgeous melted butter, and the extra sugar if you’re using it. Give it a good stir with a fork until all the crumbs are nicely damp – it should kinda feel like wet sand you’d make a sandcastle with. Spread this crumbly mix out on a baking sheet or a big plate.
Step 4: Scoop, Roll, and Let the Good Times Roll! Your Strawberry Cheesecake Crunch Bites are Coming to Life!
Okay, filling’s had its chill time? Fab! Grab it from the fridge. Using a small cookie scoop (a tablespoon-sized one is your best mate here) or even just two spoons, scoop out little portions of that yummy cheesecake filling. Gently roll each one between your hands to make a cute little ball. Something I learned the hard way: Slightly damp hands can sometimes help stop the mixture from sticking to you like crazy, but don’t go too wild with the water, or the crumbs won’t want to stick!
Step 5: Give ‘Em Their Crunchy Overcoat
This is the fun bit! Take each little cheesecake ball and roll it all around in your graham cracker crumbs. Press ever so gently so the crumbs really stick and give it a good, generous hug. Pop your beautifully coated Strawberry Cheesecake Crunch Bites onto a baking sheet lined with parchment paper. Seriously, parchment paper is a gift from the kitchen gods for easy cleanup.
Step 6: The Final Countdown Chill
Once all your Strawberry Cheesecake Crunch Bites are looking fabulous in their crunchy outfits, cover the baking sheet loosely (plastic wrap again) and back into the fridge they go. They really need at least another hour to firm up properly, but if you can leave them for 2 hours (or even make them the day before!), they’ll be even more amazing. This last chill is crucial for them to set completely and for all those flavors to really sing. Don’t rush this – patience is a virtue, especially when cheesecake is involved! (Go on, sneak a taste of the leftover filling on the spoon, I won’t tell!)
Recipes You May Like

Show Off Your Masterpiece: Serving Your Strawberry Cheesecake Crunch Bites!
Alright, rockstar, you did it! Now it’s time to present your gorgeous Strawberry Cheesecake Crunch Bites to the world (or just, you know, eat them all yourself – no judgment!). These little guys are surprisingly versatile.
- Party Animals: Pile ’em high on a pretty cake stand or a tiered tray. They look SO impressive and are just the easiest thing for people to grab at a party. Instant hit!
- Sweet Charcuterie Board Dreams: Oh yeah, add these to a dessert board! Imagine them nestled next to some fresh berries, salty chocolate-covered pretzels, maybe some mini cookies… Heaven!
- Tiny Treats, Big Impact: Pop two or three bites into mini cupcake liners. It’s such an elegant way to serve them, and it’s kinda portion control… if you can stop at a few!
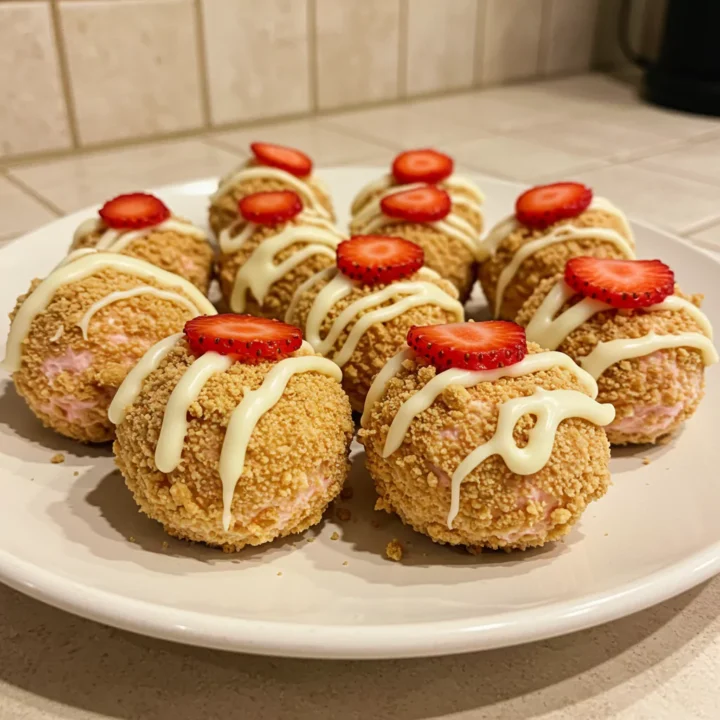
- Drizzle and Shine: Wanna get a bit fancy? Melt some white chocolate (so easy in the microwave in short bursts!) and drizzle it all over your chilled Strawberry Cheesecake Crunch Bites. While that chocolate is still wet and glossy, you can sprinkle over a few more graham cracker crumbs, some bright pink crushed freeze-dried strawberries for that pop of color, or even some fun sprinkles. A tiny mint leaf next to each one also looks super fresh and cute.
- My Personal Fave – Low-Key Indulgence: Honestly? My absolute favorite way is straight outta the fridge, maybe with a hot cup of tea or coffee, for that perfect afternoon “treat yo’self” moment. No fuss needed!
I’m a total sucker for the white chocolate drizzle and a tiny little slice of fresh strawberry on top – it just makes these Strawberry Cheesecake Crunch Bites look like they cost a fortune from some fancy patisserie!
Keeping Your Precious Strawberry Cheesecake Crunch Bites Happy
So, you’ve made a glorious batch… but what if (and it’s a big IF) there are any Strawberry Cheesecake Crunch Bites left over? Here’s the lowdown:
- Fridge is Their Friend: Your best bet is to tuck them into an airtight container and keep them chilled in the fridge. They’ll be pretty happy in there for up to 3-4 days. The crunchy coating might get a little less crunchy over time, but they’ll still be ridiculously tasty.
- Can You Freeze These Bad Boys? Totally! If you want to be a superhero and have these on hand for emergencies (you know, like a sudden cheesecake craving), here’s what to do: place the chilled bites in a single layer on a baking sheet and freeze ’em ’til they’re solid. Then, just chuck them into a freezer-safe bag or container. They’ll be good for about a month. When you want one (or five), just let them thaw in the fridge for a few hours. The strawberries might be a tiny bit softer, but honestly, still delish.
- Genius Prep-Ahead Tips for Us Busy Folks:
- That yummy cheesecake filling? You can make it a whole day ahead. Just keep it covered up in the fridge.
- And the graham cracker coating? Yep, that too! Make it, store it in an airtight container at room temp, and you’re golden.
- Then, when you’re ready to make your Strawberry Cheesecake Crunch Bites, it’s just a quick assembly job. So smart, right?
Just remember, cool is key for these creamy wonders!
Okay, Real Talk: Why I’m Completely, Utterly Obsessed with These Strawberry Cheesecake Crunch Bites!
Can you even tell I’m a little bit (okay, a LOT) nuts about these Strawberry Cheesecake Crunch Bites?! It’s just… they’re EVERYTHING. They give you all that rich, creamy, tangy, sweet, fruity joy of a classic strawberry cheesecake, but without any of the usual baking stress – no faffing with water baths, no nail-biting moments wondering if it’s cracked. Just pure, unadulterated, easy deliciousness. And the fact that they’re tiny? Brilliant! Perfect for sharing (if you’re feeling generous!), perfect for parties, perfect for a Tuesday night when you just need something amazing. That incredible combo of the velvety smooth cheesecake filling just bursting with those fresh strawberry bits, against that buttery, toasty, crunchy graham cracker coating… Ugh, it’s just too good. It’s one of those recipes that makes everyone happy.
I really, really, REALLY hope you give these Strawberry Cheesecake Crunch Bites a go. They are such a joy to make, and an even bigger joy to eat. And when you do (because I know you will!), you HAVE to tell me all about it in the comments below! I genuinely love hearing how recipes turn out for you guys and if you put your own spin on things. Happy dessert making, my friends! You’ve got this!
Strawberry Cheesecake Crunch Bites
Easy no-bake Strawberry Cheesecake Crunch Bites! Creamy cheesecake, fresh strawberries, crunchy graham cracker coating. Perfect dessert recipe! Make them today!
Ingredients
- 16 ounces (2 blocks) cream cheese, softened
- 1 cup fresh strawberries, finely diced
- 3/4 cup granulated sugar
- 1 teaspoon pure vanilla extract
- 1 tablespoon fresh lemon juice
- 1.5 cups graham cracker crumbs (approx. 10-12 full sheets)
- 6 tablespoons unsalted butter, melted
- 2 tablespoons granulated sugar (optional, for crust)
- Optional: 4 ounces white chocolate, for drizzling
- Optional: Extra graham cracker crumbs, for garnish
- Optional: Small strawberry slices or minced freeze-dried strawberries, for garnish
Instructions
Step 1: Let’s Make That Creamy Strawberry Filling!
In a decent-sized bowl, toss in your softened cream cheese. Now, grab your electric mixer (or a whisk and some elbow grease!) and beat it on medium speed ’til it’s all lovely and smooth – probably 2-3 minutes. Don’t forget to scrape down the sides of the bowl a few times so no cream cheese gets left behind! Now, slowly add your sugar and keep that mixer going until it’s all light and fluffy. Next up, stir in your vanilla and that zingy lemon juice. And finally, the star: gently fold in those finely diced fresh strawberries. Try not to get too aggressive with the mixing here; we want pretty little pieces of strawberry, not strawberry mush. Quick tip from my kitchen fails: If your strawberries are super juicy, just give them a little pat with a paper towel after you dice them. It stops the filling from getting a bit too watery.
Step 2: First Chill Sesh
Cover that bowl up (plastic wrap, a plate, whatever works) and let it hang out in the fridge for at least an hour. This little rest helps the mixture firm up just enough to make it way less messy to scoop later. Perfect time to make your crunchy coating if you haven’t already!
Step 3: Time to Get Crumbly!
In another bowl, mix up your graham cracker crumbs, that gorgeous melted butter, and the extra sugar if you’re using it. Give it a good stir with a fork until all the crumbs are nicely damp – it should kinda feel like wet sand you’d make a sandcastle with. Spread this crumbly mix out on a baking sheet or a big plate.
Step 4: Scoop, Roll, and Let the Good Times Roll! Your Strawberry Cheesecake Crunch Bites are Coming to Life!
Okay, filling’s had its chill time? Fab! Grab it from the fridge. Using a small cookie scoop (a tablespoon-sized one is your best mate here) or even just two spoons, scoop out little portions of that yummy cheesecake filling. Gently roll each one between your hands to make a cute little ball. Something I learned the hard way: Slightly damp hands can sometimes help stop the mixture from sticking to you like crazy, but don’t go too wild with the water, or the crumbs won’t want to stick!
Step 5: Give ‘Em Their Crunchy Overcoat
This is the fun bit! Take each little cheesecake ball and roll it all around in your graham cracker crumbs. Press ever so gently so the crumbs really stick and give it a good, generous hug. Pop your beautifully coated Strawberry Cheesecake Crunch Bites onto a baking sheet lined with parchment paper. Seriously, parchment paper is a gift from the kitchen gods for easy cleanup.
Step 6: The Final Countdown Chill
Once all your Strawberry Cheesecake Crunch Bites are looking fabulous in their crunchy outfits, cover the baking sheet loosely (plastic wrap again) and back into the fridge they go. They really need at least another hour to firm up properly, but if you can leave them for 2 hours (or even make them the day before!), they’ll be even more amazing. This last chill is crucial for them to set completely and for all those flavors to really sing. Don’t rush this – patience is a virtue, especially when cheesecake is involved! (Go on, sneak a taste of the leftover filling on the spoon, I won’t tell!)