Listen, I gotta be honest. My first attempts at homemade chicken tenders were… well, let’s just say they wouldn’t win any awards. Think sad, floppy breading and chicken that was just meh. I was SO frustrated because I knew that amazing, crunchy, juicy tender was possible! So, I kinda went into mad scientist mode. Tried a million things (my family are saints, truly). But then… BAM! I figured it out. And this buttermilk chicken tenders recipe is the result. It’s practically foolproof, ridiculously tasty, and gives you that insane crunch every single time. You HAVE to try this.
What You Need (Don’t Worry, It’s Basic Stuff!)
Alright, let’s grab the stuff we need. No weird ingredients here, promise! And if you’re missing something? No biggie, we can probably wing it for this awesome buttermilk chicken tenders recipe.
- Chicken Tenderloins: ‘Bout 1.5 pounds (like 6-7 tenderloins per person, maybe?). Tenderloins are great ’cause they’re already tender (duh!). If you’ve only got chicken breasts, just slice ’em into strips, maybe an inch thick? Just try to make ’em kinda the same size. Easy.
- Buttermilk: Like 1.5 cups. This stuff is magic for making chicken juicy and giving it that little tang.
- No buttermilk? Don’t sweat it! Seriously, just pour 1.5 tablespoons of white vinegar or lemon juice into a measuring cup and top it up with regular milk to the 1.5 cup line. Stir it, wait 5 mins. Boom, instant buttermilk substitute! Plain yogurt thinned out works too. See? Easy.
- All-Purpose Flour: About 2 cups. Just regular ol’ flour.
- Cornstarch: Just 1/4 cup. Okay, this is my little secret for extra crunch. If you have it, use it! Makes a difference.
- Spices (The Fun Part!):
- Salt (like 2 tsp total, but taste as you go!)
- Black Pepper (1 tsp – grind it fresh if you can!)
- Paprika (2 tsp – smoked or regular, whatever you like! Adds color!)
- Garlic Powder (1 tsp)
- Onion Powder (1 tsp)
- Want heat? A pinch (like 1/2 tsp) of Cayenne Pepper!
- Egg: Just one large egg, beat it up quick with a fork. Helps the crunchy stuff stick.
- Oil for Frying: You need enough oil to let the chicken kinda swim – maybe 3-4 cups? Veggie oil, canola, peanut… whatever neutral stuff you have is fine.

How Long Does It Take? (Spoiler: Mostly Waiting!)
Okay, time check! Don’t let the “marinating time” freak you out. Most of it is just the chicken chilling in the fridge while you do literally anything else. This buttermilk chicken tenders recipe is faster than it looks!
- Active Prep: Maybe 15-20 mins? Just mixing stuff and breading.
- Marinating: At least an hour is good, but 2-4 hours is even better if you have time. Just cover the bowl and stick it in the fridge. Forget about it!
- Cooking: Frying is super quick – like 15-20 mins total because you do it in batches.
- Total Time: Yeah, it adds up on paper (like 1.5 – 4.5 hrs), but your actual hands-on time? Probably under 40 minutes total!
You can totally get the chicken marinating way ahead of time, then just bread and fry when you’re ready to eat. Way less hassle than you’d think for something THIS good.
Step-by-Step: Let’s Make These Tenders! (It’s Easy, Promise!)
Ready? Let’s do this. Making this buttermilk chicken tenders recipe is honestly pretty simple. Just follow along!
Step 1: Buttermilk Bath Time!
Grab a bowl. Pour in the buttermilk and about 1 tsp of the salt. Whisk it for two seconds. Toss in the chicken tenders. Make sure they’re all wet. Cover the bowl (plastic wrap, a plate, whatever) and shove it in the fridge. Let it hang out for at least an hour (longer is better, remember?). Done. See? Easy.
Step 2: Get Your Breading Stuff Ready
When you’re getting close to cook time (like 15 mins before), set up your dipping station. Makes things way less chaotic.
- Dry Mix: Get a shallow dish (pie plate, baking dish, whatever). Dump in the flour, cornstarch, the other tsp of salt, pepper, paprika, garlic powder, onion powder, and cayenne (if using). Mix it all up really well with a fork or whisk. You want flavor in every bite!
- Egg Dip: Crack the egg into another shallow dish. Whisk it up. Takes 5 seconds.
- Ready Plate: Have a clean plate or wire rack nearby for the breaded chicken.
Step 3: Bread the Chicken (Messy Fun Time!)
Okay, breading time! Yeah, it can get a little messy, just embrace the chaos. It’s worth it! One tender at a time:
- Pull a tender out of the buttermilk, let the extra goo drip off.
- Roll it in the flour mix. Pat it gently so the flour sticks.
- Quick dip in the egg.
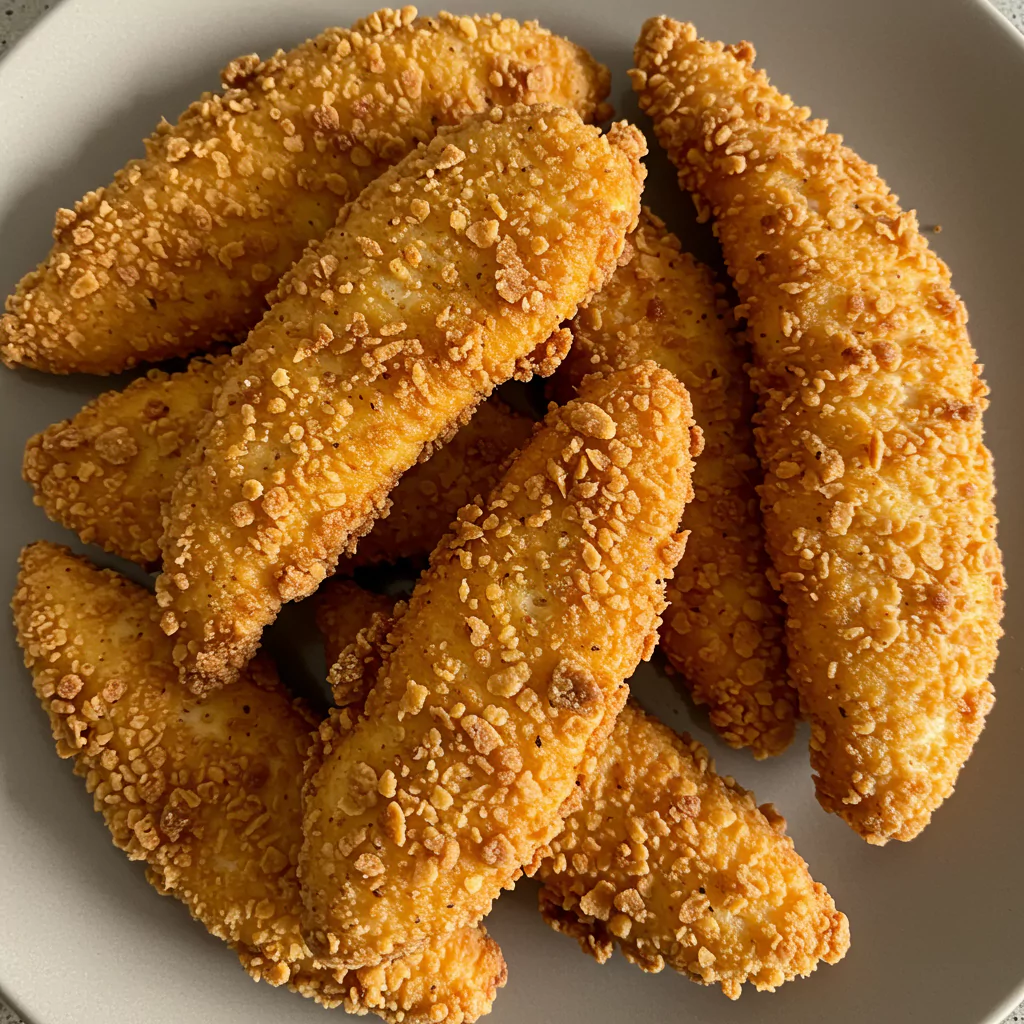
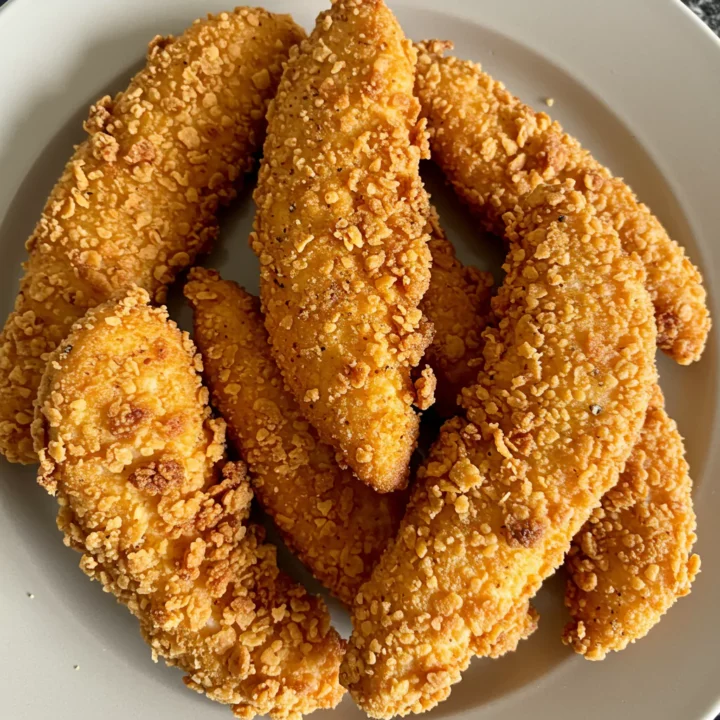
- Back into the flour mix! This is the double dip – sounds fancy, but it just means dip it in flour twice. REALLY press the flour on this time. This is what makes it super crunchy!
- Plop the breaded tender onto your waiting plate/rack. Repeat!
- Hot Tip: If you can, let the breaded chicken just sit there for 10-15 minutes before frying. Helps the coating stick on better in the hot oil. Less naked chicken spots!
Step 4: Fry ‘Em Up! Crispy Town, Here We Come!
Time to cook! This part goes fast.
- Pour your oil into a sturdy pot or deep-ish skillet (enough oil so the chicken can float a bit).
- Turn the heat to medium-high. Get that oil hot! How hot? Around 350°F (175°C) is perfect. A thermometer is awesome, but if you don’t have one, carefully flick a tiny bit of the flour mixture into the oil. If it sizzles and bubbles happily right away, you’re probably good to go. If it just sinks or barely bubbles, wait longer. If it smokes like crazy, turn the heat down a bit!
- Gently place 4 or 5 tenders into the hot oil. Don’t crowd them! They need space to get crispy. If you put too many in, the oil cools down, and they get soggy. No good.
- Fry for about 3-5 minutes per side. Flip ’em carefully with tongs. You want them gorgeously golden brown and crispy all over. Chicken needs to be cooked through (no pink inside!).
- Lift the cooked tenders out, let the oil drip off for a sec.
- Put them on a wire rack if you have one (keeps them crispier than paper towels).
- Make sure the oil gets hot again before adding the next batch! Keep going ’til they’re all done!
That’s it! You just totally nailed this buttermilk chicken tenders recipe! High five!
Recipes You May Like
How to Eat ‘Em (The Best Part!)
Okay, you made the amazing buttermilk chicken tenders recipe, now what? DIVE IN!
- Dips are Mandatory: Seriously. Honey mustard, ranch, BBQ, ketchup… whatever floats your boat! Put out a few!
- Sidekicks: Fries are classic! Coleslaw is awesome. Mac and cheese? Heck yes. A simple salad? Sure, if you wanna pretend to be healthy.
- Next Level: Chop ’em up for salads or wraps later. Or just eat ’em cold standing over the sink (we’ve all been there).
- Try This: A little drizzle of hot honey? Oh man. So good.
Storing Leftovers (If You Have Any!)
Miracle of miracles, you have leftover buttermilk chicken tenders recipe goodies? Sweet!
- Fridge: Cool ’em down completely first! Then airtight container, fridge, 3-4 days.
- Freezer: Cool ’em, freeze ’em flat on a tray first ’til solid, then toss ’em in a freezer bag. Good for a couple of months.
- Reheating (IMPORTANT!): NO MICROWAVE! It makes them sad and rubbery. Use your oven/toaster oven (like 400°F/200°C for 10-15 mins) or your air fryer (375°F/190°C for 5-8 mins). Either will bring back the crisp! Air fryer is like magic for this.
Why I’m Obsessed & You Will Be Too
Okay, real talk. I make this buttermilk chicken tenders recipe ALL the time because it’s just that good and that easy. It’s the massive crunch, the super juicy chicken inside, the flavor… it just hits different when it’s homemade. It feels like a treat, but it’s totally doable on a weeknight. Kids love it, adults fight over the last one… it’s just a winner.
Seriously, give this recipe a shot! Don’t be intimidated by the frying or the steps, it’s simpler than it sounds. And when you make them, PLEASE come back and tell me how it went in the comments! Did you love it? Find a new favorite dip? I wanna know! Happy cooking!
buttermilk chicken tenders recipe
The ultimate buttermilk chicken tenders recipe! Get super crispy, juicy, easy homemade tenders every time with simple tips. Learn how!
Ingredients
- 1.5 lbs chicken tenderloins (or chicken breasts sliced thin)
- 1.5 cups buttermilk (or milk + 1.5 tbsp vinegar/lemon juice, rested 5-10 mins)
- 2 cups all-purpose flour
- 1/4 cup cornstarch (for extra crunch!)
- 2 tsp salt (we'll divide this)
- 1 tsp black pepper (freshly ground is best!)
- 2 tsp paprika (smoked or sweet)
- 1 tsp garlic powder
- 1 tsp onion powder
- 1 large egg, beaten lightly
- 3-4 cups neutral oil for frying (like vegetable or canola)
- Optional: 1/2 tsp cayenne pepper for a kick
Instructions
- Marinate Chicken: Mix the buttermilk and 1 tsp salt in a bowl, add the chicken and making sure it's all coated. Cover it up and pop it in the fridge for at least 1 hour (but heyy 2-4 hours is even better if you've got time!).
- Set Up Breading Station: When you're getting ready to cook, grab two shallow dishes. In one whisk together the flour, cornstarch, the other 1 tsp salt, pepper, paprika, garlic powder, onion powder and cayenne (if you're using it). Make sure it's mixed well!! In the second dish, just have your lightly beaten egg ready. Keep a clean plate nearby too.
- Bread Like a Boss: Take a chicken tender out of the buttermilk, let the extra drip off. First, roll it in the flour mixture. Then, give it a quick dunk in the egg. Finally, put it back in the flour mixture for a second coat – really press it on this time to get maximum crunch! Place the breaded tender on your clean plate. Do this for all the tenders. Quick tip: Let the breaded chicken sit for 10-15 minutes before frying if you can - helps the coating stick!
- Fry to Crispy Perfection: Heat your oil in a heavy pot or deep skillet over medium-high heat until it's about 350°F (175°C) - use a thermometer if you got one,, Carefully lower 4-5 tenders into the hot oil (don't overcrowd!). Fry for about 3-5 minutes per side, until they're beautifully golden brown and cooked through. Use tongs to take them out and place them on a wire rack to drain. Make sure the oil comes back to temp before adding the next batch!!