You know what’s funny? I still remember burning my first batch of Old Fashioned Chocolate Fudge so badly that my smoke detector went off at 2 AM. My downstairs neighbor wasn’t thrilled. That was batch #1 of probably 30 before I got it right! My grandmother’s recipe card was stained and faded, with half the instructions smudged beyond recognition. But after countless late nights, a broken candy thermometer, and one particularly memorable kitchen meltdown (pun intended), I finally cracked the code. What makes Old Fashioned Chocolate Fudge so magical is that perfect texture—not too soft, not too firm, with those tiny sugar crystals that give it that subtle graininess. You just can’t get that from those microwave shortcuts. When my daughter first tried the successful batch, she said, “It tastes like Christmas at Grandma’s!” That’s exactly what I was going for.
Ingredients for Bliss: Your Fudge Treasure Hunt!
Alright, let’s grab our gear! Making fudge feels way less intimidating when you’ve got everything lined up, like your own little cooking show setup. Think of this as gathering magic beans for our Old Fashioned Chocolate Fudge adventure:
- Sugar (2 cups / 400g): Just plain ol’ white sugar. It’s the sweet heart of the matter!
- Unsalted Butter (1/2 cup / 113g), chopped: Ahh, butter. The secret to that melt-in-your-mouth richness. Use unsalted so you’re the salt boss. (Got salted? Just skip the pinch of salt later, easy fix!). If you’re doing the vegan dance, good plant-based butter sticks usually play nice, texture might just be a tiny bit different, NBD.
- Evaporated Milk (5 oz can / 150ml): This stuff is liquid gold for fudge! It’s super concentrated creaminess, giving us that perfect dense texture without making things watery. Trust me on this one!
- Semi-Sweet Chocolate Chips (12 oz / 340g): Hello, gorgeous! Use chips you actually like eating straight up. Good chocolate = good fudge, simple as that. Feel free to use chopped baking bars or even go darker (hello, 70% cacao!) if you like things less sweet and more intense.
- Marshmallow Creme/Fluff (7 oz jar / ~200g): Okay, THIS is the cheat code for smooth fudge every single time. Seriously! It stops sugar from getting all crunchy and weird. It’s like fluffy, delicious insurance. Don’t skip it if you want guaranteed success!
- Pure Vanilla Extract (1 tsp): Not just vanilla flavour, it somehow makes the chocolate taste even MORE chocolatey. Magic, I tell ya! Use the good stuff, not the fakey kind.
- Salt (1/4 tsp): Just a whisper! It wakes up all the other flavours.
(Totally Optional, But Highly Recommended)
Candy Thermometer: Please, please, please use one if you can! It takes ALL the stress out of hitting that perfect temperature. Your best buddy for fudge domination!
Chopped Nuts (1 cup): Walnuts or pecans are classic for a reason! That little textural surprise? Mwah! Toast ’em lightly first – game changer!

Timing Your Fudge Adventure (It’s Mostly Waiting)
Okay, deep breath! Making Old Fashioned Chocolate Fudge sounds like a big production, but honestly? Most of the time involved is just you trying really hard not to eat it while it cools. Here’s the lowdown:
Total Time Reality Check: So yeah, maybe 3-4 hours pass, but you only worked for maybe 35 minutes total! Way less elbow grease than grandma used to need! Think of it as a tiny bit of effort now for a HUGE payoff in deliciousness later. Best. Trade. Ever.
Get Your Kit Together (Prep): Like 15 mins max. Seriously, just grabbing bowls, lining the pan (thank me later!), finding that darn thermometer. Boom, done.
Stove Top Fun Time (Cooking): About 15-20 minutes of stirring and watching bubbles. It’s kinda mesmerizing, actually! This is your main ‘active duty’ time.
The Agony of Waiting (Cooling & Setting): Okay, this is the longest part – at least 2-3 hours. BUT, you don’t have to do anything! Go binge a show, call your mom, take a nap… your fudge is just chilling (literally!). Patience is tough, I know, but so worth it!
Crafting Your Old Fashioned Chocolate Fudge: Step-by-Step (You Can TOTALLY Do This!)
Alright, let’s dive in! Don’t worry, I’ll be right here with you. We are going to rock this Old Fashioned Chocolate Fudge.
Step 1: Pan Prep Power!
First up, grab your 8×8 pan. Line that baby with parchment paper, leaving some hanging over the sides like little handles. Future-you lifting out perfect fudge will thank past-you profusely. Give the paper and any naked pan bits a quick spritz of non-stick spray or a buttery wipe-down. We want zero sticking drama! Set it nearby, ready for action.
Step 2: Melt It Down Smooth
Okay, into a sturdy saucepan (heavy bottom = happy fudge, trust me!), toss in your sugar, butter chunks, and that can of evaporated milk. Pop it on medium heat and start stirring. Keep swirling that spoon around while the butter gets melty and the sugar dissolves completely. How can you tell? If you carefully take a tiny bit on your spoon (let it cool!), it should feel totally smooth between your fingers, no sandy grit. Looks kinda glossy too. This step is KEY to avoiding grainy fudge blues!
Step 3: The Temperature Tango! (Deep Breaths!)
Here we go – the slightly nerve-wracking bit, but you’ve got this! Let the mixture come to a lively boil. Clip on your candy thermometer (make SURE the tip is in the liquid, not hitting the pan bottom!). Now, just let it bubble away, stirring often enough it doesn’t stick or scorch, until that thermometer hits the magic window: 234°F to 238°F (that’s 112°C – 114°C). This is IT. This temp dictates your final texture. Hitting it right feels like winning the lottery! Don’t guess – let the thermometer be your guide!
Step 4: All Together Now!
YES! You hit the temp! Whip that pan off the heat right away. Okay, quick! Dump in the chocolate chips, the whole glorious jar of marshmallow fluff, the vanilla, and the salt. If you’re using nuts, chuck ’em in too! Now, stir like your life depends on it (okay, maybe not that dramatic, but stir vigorously!). Mix until every last bit of chocolate and marshmallow melts into one gorgeous, thick, smooth, super-glossy river of deliciousness. You’ll literally see it transform – it’s awesome!
Step 5: Pour and… Wait (Ugh, I Know!)
Carefully pour this liquid heaven into the pan you prepped earlier. Nudge it gently with your spatula so it’s nice and even. And now… the true test of willpower. Let. It. Cool. On. The. Counter. Completely. Give it at least 2-3 hours. Resist the fridge for now – slow cooling = better texture! Once it’s mostly cool and firming up, then you can slide it into the fridge if you want it extra solid or if your kitchen is warm.
Step 6: The Grand Finale – Slice and Swoon!
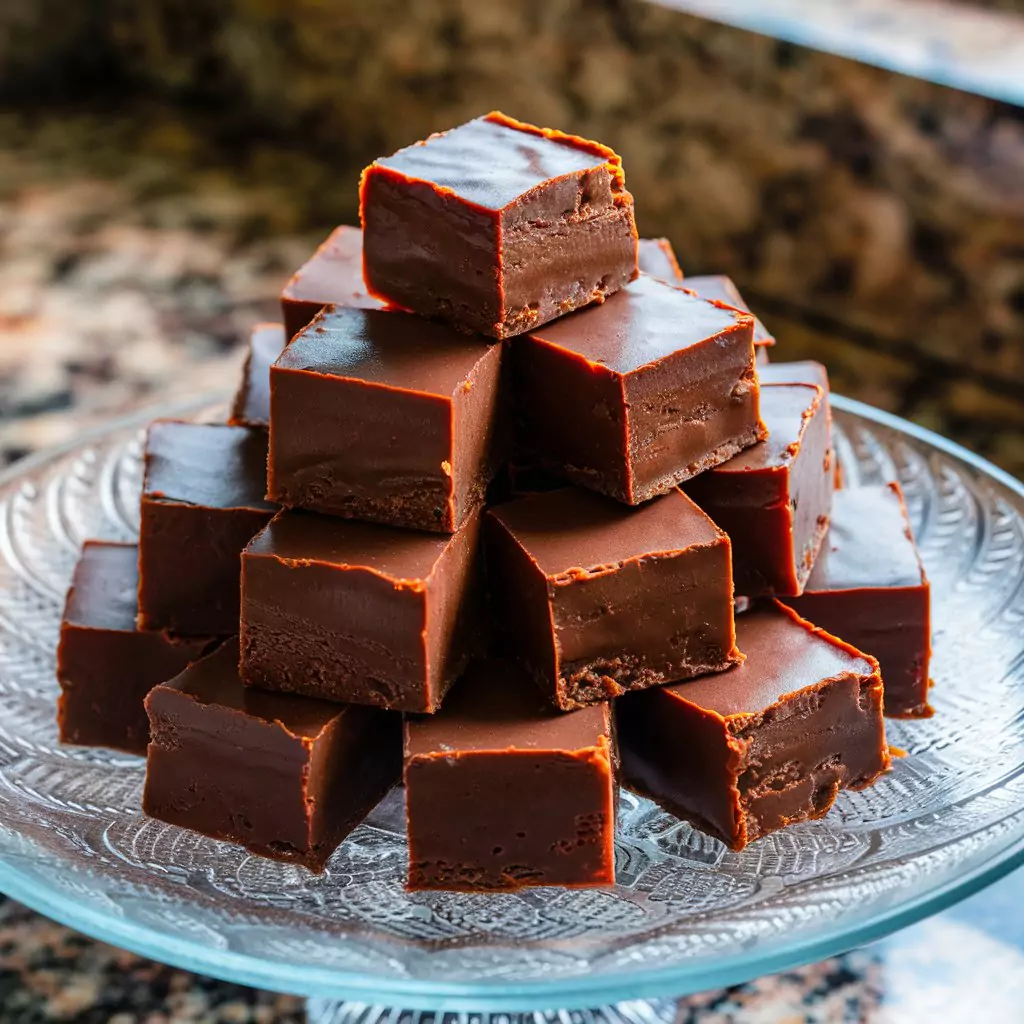
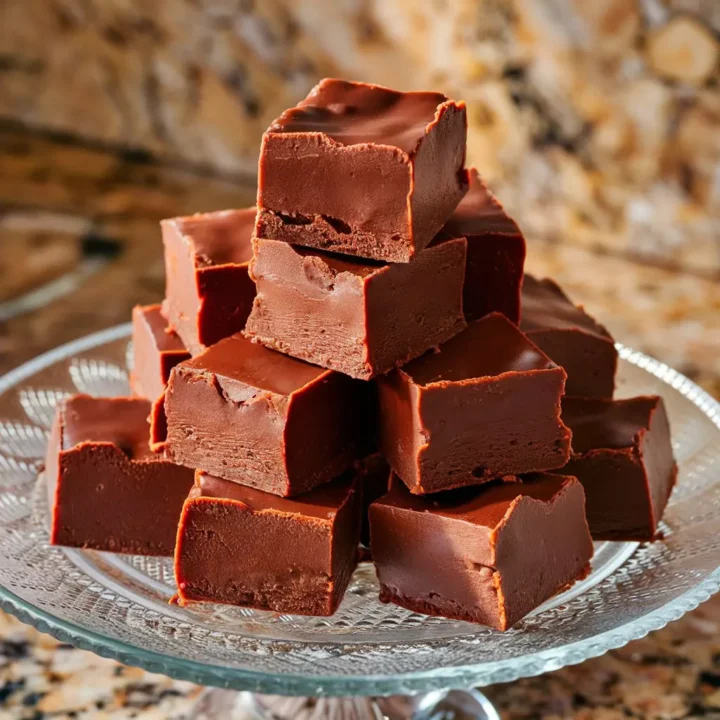
Is it firm?! Woohoo! Use those parchment handles (see? Genius!) and lift the whole block out onto a cutting board. Grab your biggest, sharpest knife. Hot tip for clean cuts: Dip the blade in hot water, wipe it dry, slice. Repeat. Works like a charm! Cut into small squares – remember, this Old Fashioned Chocolate Fudge is RICH and amazing, so little bites are perfect! Pop one in your mouth. YOU DID IT!
Healthier Alternatives for the Recipe
Okay, so Old Fashioned Chocolate Fudge is, well, fudge. It’s supposed to be decadent! But if you’re trying to nudge it slightly towards the “less guilty” side:
- Sugar Negotiation: You might be able to get away with reducing the sugar by a smidge (like 1/4 cup max?), but fair warning, it could make the final fudge a little softer. Using a really dark chocolate (70%+) naturally makes it less sweet anyway!
- Good Additions: Definitely keep the nuts in if you like ’em! Walnuts and pecans bring good fats and make it more satisfying. You could even try stirring in a tablespoon of chia or ground flax when you add the chocolate – adds fiber and nobody will taste it!
- Dark Side Perks: Choosing dark chocolate gives you more antioxidants. Feels kinda virtuous, right?
- The Small Slice Strategy: Honestly? The easiest trick is just cutting smaller squares. You still get that incredible flavour hit, just less of it at once. Perfect for savouring!
Serving Suggestions
Elevate your old fashioned chocolate fudge experience with these presentation ideas:
- Serve alongside fresh berries for a delightful contrast in flavor and texture
- Pair small squares with strong espresso or coffee to balance the sweetness
- Create a dessert board featuring fudge squares alongside complementary flavors like sea salt caramels and candied orange peel
- Sprinkle with flaked sea salt just before serving for a modern sweet-savory twist
- For entertaining, place individual pieces in mini cupcake liners arranged on a vintage cake stand
- During winter holidays, serve with peppermint tea or hot chocolate topped with homemade marshmallows
Serving Suggestions
Your masterpiece is ready! This Old Fashioned Chocolate Fudge shines all on its own, but if you wanna jazz it up:
- Au Naturel: Just pile those beautiful squares on a plate. A little sprinkle of flaky sea salt on top? Divine! Looks fancy, tastes amazing.
- Giftable Goodness: Tuck squares into little cello bags tied with pretty ribbons, or layer them in a cute tin with wax paper between. Best. Gift. Ever. Seriously, people love homemade fudge.
- Party Board Hero: Make it the sweet star! Surround it with salty pretzels, juicy berries, maybe even some sharp cheddar for contrast. That sweet/salty/tangy mix is everything.
- Ice Cream’s BFF: Oh. My. Goodness. Gently warm a square (like 10 secs in the microwave) till it’s just melty… spoon over vanilla ice cream. Stop it. Or just crumble cold fudge right on top. Pure bliss either way.
- My Happy Place: Honestly? Curled up with a steaming mug of coffee and one perfect square of this fudge. That’s my ultimate cozy moment right there.
Storing Tips for the Recipe
You guarded this Old Fashioned Chocolate Fudge through the cooling process, now let’s keep it tasting perfect!
Freeze It Like a Pro: Yep! Wrap it super well in plastic wrap, then pop that into a freezer bag or container. Good for months! Thaw in the fridge overnight, then let it warm up a bit on the counter.
Lock it Down: An airtight container is your #1 tool. Keeps it fresh, stops it from getting dry or absorbing weird fridge smells (ew).
Counter Life: If your house is cool (think under 70°F/21°C), your fudge is fine on the counter for about a week. Use wax paper bits between layers so they don’t glue themselves together!
Chill Out Zone: Need it to last longer? The fridge is your friend! It’ll keep well in its airtight box for 2-3 weeks. It will get firmer when cold, just FYI.
De-Chill Before Eating: If you stored it in the fridge, let it hang out on the counter for 15-20 minutes before serving. It makes a HUGE difference to that creamy texture!
Why I’m Obsessed With This Recipe (And You’re About To Be!)
Let me tell you about my absolute obsession with homemade chocolate fudge. This isn’t just any dessert – this is my WEAKNESS.
Every time I make it, I get giddy watching those simple ingredients do their magical dance in the pot. First, they’re just… stuff. Then suddenly – BOOM! This glossy, velvety pool of chocolate heaven starts to form. And the SMELL? Oh my goodness! My entire house transforms into this chocolate wonderland that has everyone wandering into the kitchen asking, “What is THAT?”
That moment when you take your first bite? I literally close my eyes every single time. The way it melts so perfectly, coating your tongue with that intense chocolate flavor that’s somehow both rich and nostalgic at the same time. It’s not just fudge – it’s like time travel in a bite. Pure happiness in square form.
I’ve made this recipe for holiday gifts, taken it to office parties, shared it with neighbors having bad days… and I swear it’s like handing people a little square of joy. Their eyes light up, and they always ask for the recipe!
Have you tried making real, old-fashioned fudge before? Or does your family have some secret recipe with a weird ingredient that makes it extra special? I am DYING to hear your fudge stories! The successes, the dramatic fails (we’ve all had that batch that never set, right?), family traditions – spill it all! Let’s chat about our fudge experiences!
Recipes You May Like
Old Fashioned Chocolate Fudge
Creamy, dreamy Old Fashioned Chocolate Fudge recipe with rich chocolate and nostalgia. Easy steps for perfect fudge—try it now!
Ingredients
- 2 cups (400g) sugar – the sweet foundation of our fudge
- 1/2 cup (113g) unsalted butter, chopped – for that melt-in-your-mouth vibe (or use salted and skip the extra salt)
- 5 oz (150ml) evaporated milk – the creamy secret to perfect texture
- 12 oz (340g) semi-sweet chocolate chips – pick ones you’d snack on, they’re the star!
- 7 oz (~200g) marshmallow creme/fluff – your smoothness superhero
- 1 tsp pure vanilla extract – boosts the chocolate magic
- 1/4 tsp salt – just a pinch to make flavors pop
- 1 cup chopped nuts (optional) – walnuts or pecans for a crunchy twist
Instructions
- Get the Pan Ready: Grab your trusty 8x8 pan and line it with parchment paper—let some hang over the sides like little handles for later. Trust me, you’ll thank yourself when it’s time to lift this beauty out! Dab a bit of non-stick spray or swipe some butter on the paper and any bare pan edges. No sticking allowed here! Set it close by—we’ll need it soon.
- Melt the Sweet Stuff: Toss your sugar, chopped butter, and evaporated milk into a solid saucepan—the heavy-bottom kind is your best friend for even heating. Crank the stove to medium, grab a spoon, and start stirring. Keep going until the butter’s all melty and the sugar’s completely dissolved. Want to check? Sneak a tiny cooled drop onto your fingers (careful, it’s hot at first!) and rub—it should feel silky, not gritty. That’s your green light!
- Boil to Perfection: Alright, here’s where it gets fun! Let that mixture bubble up into a happy boil. Clip your candy thermometer on the side—make sure the tip’s dunked in the liquid, not touching the pan bottom. Stir now and then so nothing sticks, and watch until it hits 234°F to 238°F (112°C to 114°C). This is the sweet spot that makes your fudge just right—smooth and dreamy. Hang in there, you’re crushing it!
- Mix in the Magic: Woohoo, you nailed the temp! Yank that pan off the heat quick. Now, pile in the chocolate chips, that whole jar of marshmallow fluff, a splash of vanilla, the salt, and those nuts if you’re feeling fancy. Grab your spoon and stir like it’s your mission in life! Keep at it until everything melts together into a thick, glossy, chocolatey masterpiece. It’s so satisfying to watch it come together—you’ll see what I mean!
- Pour and Play the Waiting Game: Time to pour this deliciousness into your prepped pan. Use your spatula to nudge it into an even layer—nice and smooth. Now, the hard part: let it cool on the counter for 2-3 hours. I know, I know, it’s torture, but skipping the fridge at first keeps it creamy. Once it’s mostly set, you can pop it in the fridge if your kitchen’s warm or you’re impatient like me!
- Cut and Celebrate: Is it firm yet? Yes! Use those parchment handles to lift it out onto a cutting board—genius move, right? Grab a big, sharp knife (pro tip: dip it in hot water and wipe dry between cuts for perfect edges). Slice into little squares—this stuff’s rich, so small bites are the way to go. Pop one in your mouth, close your eyes, and savor it. You just made fudge perfection—high five!
Notes
Nutrition Information:
Yield:
36 small squaresAmount Per Serving:Calories: Approximately 120 calories per square