My first attempts? Ha! Let’s just say they were… memorable. More like chicken soup with little dense dough balls floating sadly in it. Not exactly the cloud-like dumplings I dreamed of. I fiddled, I fussed, my family patiently ate batch after batch (bless their hearts!), and then – BAM! – I discovered the magic trick hiding in plain sight: that bright yellow box of Bisquick. Suddenly, everything clicked. This Bisquick chicken and dumplings recipe is now my tried-and-true, never-fails-me method. It tastes like it simmered lovingly on the stove for hours and hours, but guess what? It doesn’t! It’s my secret weapon for weeknights, rainy days, or anytime someone just needs a little edible sunshine. You get that rich, savory, creamy soup PLUS those unbelievably light, fluffy dumplings every single time. It’s just… good.
What You Gotta Grab (Your Bisquick Chicken and Dumplings Recipe Shopping List!)
Alright, let’s round up the troops! No weird, hard-to-find stuff here, just simple ingredients that come together beautifully. Think fresh from the souk veggies if you can snag ’em!
For the Heart & Soul (The Soup):
- Chicken: About 1.5 pounds of boneless, skinless chicken. Breasts work, but listen – thighs are where it’s AT for flavor and staying juicy. Trust me! Sometimes I use a combo if I have both.
- Butter or Olive Oil: Two tablespoons. Butter = classic yummy richness. Olive oil = also great! You do you.
- The Holy Trinity of Flavor:
- 1 big yellow onion, chopped up nice and small (about 1.5 cups). Makes the kitchen smell amazing!
- 2-3 carrots, peeled and sliced or diced (about 1 cup). Adds color and that touch of sweetness.
- 2-3 celery stalks, sliced or diced (about 1 cup). That fresh background note you need.
- Garlic: 2 or 3 cloves, minced. Or more. Let’s be honest, is there ever really too much garlic? I think not.
- Flour Power: 1/4 cup all-purpose flour. This little guy helps make the broth velvety smooth.
- Broth: 6 cups (that’s about 1.5 liters) of chicken broth. Low-sodium is your friend here so you control the salt. Veggie broth can sub in too.
- Herbs & Spices – The Fun Part!:
- 1 teaspoon dried thyme (fresh sprigs are lovely too if you have ’em!)
- 1/2 teaspoon dried rosemary (crush it a bit in your hand first – wakes it right up!)
- 1/2 teaspoon black pepper (freshly cracked if you can – it just hits different!)
- Salt! Start with 1/2 teaspoon, maybe? Taste, taste, taste later!
- Totally Optional: A bay leaf. Adds a little somethin’-somethin’. Just remember to fish it out!
- Creaminess Factor: 1/2 cup heavy cream or half-and-half. Oh yeah. This makes it decadent. Whole milk is fine for less richness, or just skip it!
- Green Goodness: 1 cup frozen peas. Stir ’em in at the end for a pop of color and sweetness. Frozen corn works great too!
- Fresh Finish: Chopped fresh parsley! Makes it pretty and adds a burst of freshness. Dill is also fantastic here.
For the Fluffy Clouds (The Dumplings!):
- The Hero: 2 cups Original Bisquick™ Mix. Don’t knock it ’til you try it – this stuff is magic for easy dumplings.
- Milk: 2/3 cup. Whole milk = richest dumplings, but honestly, whatever milk you have usually works fine.
- Extra Yum (Optional!): A tablespoon of chopped fresh parsley or chives stirred right into the dumpling batter? Yes please! Looks pretty too.

How Long Will This Take? (Less Time Than You Think!)
Okay, real talk on timing because nobody likes surprises halfway through cooking dinner.
- Chopping & Getting Ready: Probably 20-25 minutes. Put on some music, maybe delegate some chopping if you have helpers!
- Cooking Time (The Simmering & Dumpling Magic): Around 60-65 minutes. A lot of this is hands-off simmering time, perfect for tidying the kitchen or, you know, scrolling your phone for a few.
- Grand Total: Figure about 80-90 minutes, give or take.
Honestly? For a meal this comforting, that tastes like it took way longer? That’s a win in my book. It’s definitely faster than starting from absolute scratch – maybe 15-20% faster than recipes where you make the dumpling dough yourself. Totally doable after work when you’re craving something cozy.
Let’s Do This! Your Guide to Chicken & Dumpling Heaven
Ready? Aprons on? Let’s make some deliciousness happen.
Step 1: Sauté Those Veggies!
Get your big pot or Dutch oven heating over medium heat with the butter or oil. Toss in the onion, carrots, and celery. Let them soften up, get friendly in the pot, for about 5-7 minutes, stirring now and then. You want them tender, not browned. Now add the garlic and stir for just one more minute until you smell that amazing garlicky goodness. My two cents: Don’t rush this! Building flavor slowly here is key.
Step 2: Make it Thick & Saucy!
Sprinkle the flour right over the cooked veggies. Stir it constantly for a minute or maybe two. You’re just cooking off that raw flour taste – nobody wants that! Okay, now slowly, slowly start whisking in the chicken broth. Add just a splash at first and whisk well to avoid lumps, then gradually add the rest, whisking as you go. Bring it all to a nice gentle simmer. Seriously, whisking while adding the broth = smooth soup success!
Step 3: Chicken Goes In, Heat Goes Down!
Carefully add your chicken pieces to the pot. Stir in the thyme, rosemary, black pepper, and that bay leaf if you’re using it. Let it come back to a gentle simmer (little bubbles, not a rolling boil!), then turn the heat way down to low, cover the pot, and let it simmer away for 20-25 minutes. The chicken should be cooked through and tender enough to shred easily. Check it: No pink inside? Easy to pull apart? It’s ready!
Step 4: Shred Chicken, Prep Dumplings!
Okay, carefully fish the chicken out and put it on a cutting board. Let it cool just enough so you don’t burn your fingers! While it’s cooling, taste that beautiful broth. Need more salt? A bit more pepper? Now’s the time! Stir in the cream or half-and-half if you’re using it, and toss in the frozen peas. Keep the soup simmering very gently. Now, for the dumplings! In a bowl, just stir the Bisquick mix and milk together. Listen carefully: DO NOT OVERMIX! Stop as soon as it’s combined. A few lumps are totally fine, actually good! Overmixing = tough dumplings, and nobody wants that. Stir in any herbs now too.
Step 5: Dumpling Time! (It’s Showtime!)
Using two spoons, or a little ice cream scoop if you have one, gently drop spoonfuls of the batter onto the simmering soup. Don’t crowd them too much; they need room to puff up! Once all the batter is happily plopped in, put the lid on tight. And now for the hard part: Walk away for 10 minutes. Don’t lift the lid! Don’t peek! Let that steam work its magic. After 10 minutes, take the lid off. Let them simmer gently, uncovered, for another 5-10 minutes until they look fluffy and cooked through. Wanna be sure? A toothpick stuck in the center should come out clean. Getting these dumplings right is the soul of this easy Bisquick chicken and dumplings recipe.
Step 6: Finish Line & Happy Bowls!
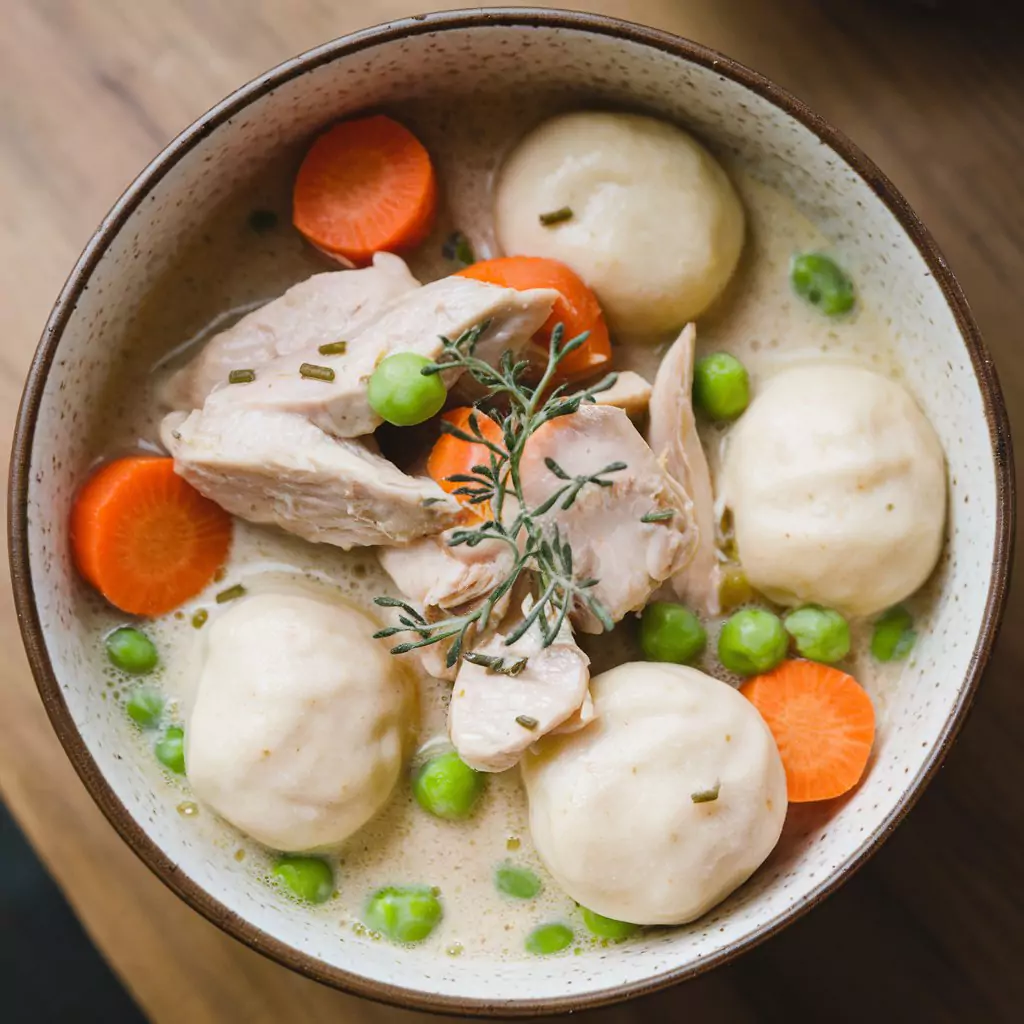
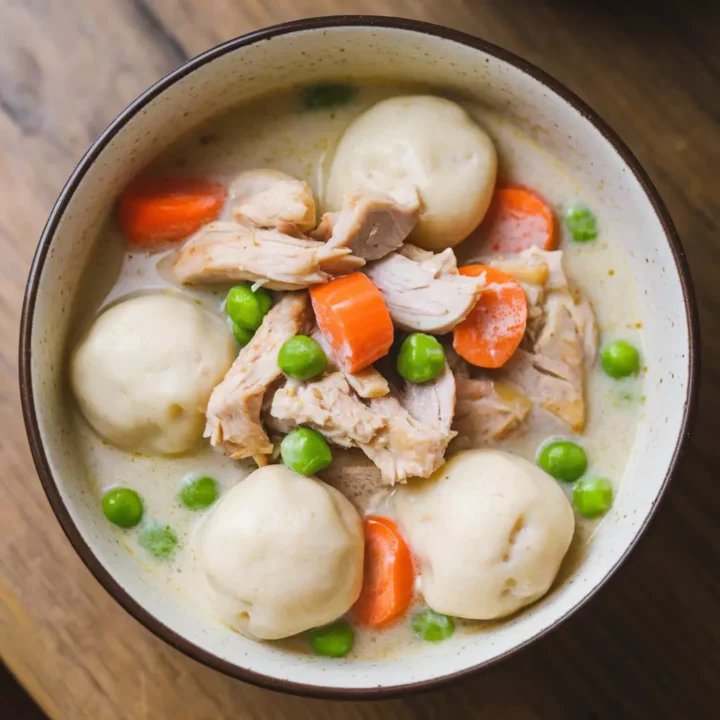
While those dumplings finish cooking, quickly shred the chicken (two forks make this super easy). Gently stir the shredded chicken back into the pot. Remember to grab that bay leaf out! Give everything one last gentle stir – be nice to those dumplings! Now, ladle generous servings of your incredible Bisquick chicken and dumplings recipe into bowls. Make sure everyone gets a bit of everything – chicken, veggies, creamy broth, and plenty of those amazing dumplings. Sprinkle with lots of fresh parsley! Dig in!
Lighten It Up? Totally Possible!
Want the comfort without quite so much richness? Easy fixes:
- Lean Chicken: Just use chicken breasts. Still great!
- More Veggies!: Add extra carrots, celery, or throw in some mushrooms or chopped kale near the end. More goodness!
- Watch the Salt: Use low-sodium broth for sure, then you’re in charge of the saltiness.
- Creaminess: Swap heavy cream for whole milk, low-fat milk, or even skip it! The soup will be less rich but still flavorful.
- Whole Grains?: You could try a whole wheat baking mix, but watch the dumplings – they might cook a little differently.
- Smaller Bowl, Big Salad: Enjoy a slightly smaller serving with a giant, crisp salad on the side. Perfect balance!
How We Love to Eat Our Bisquick Chicken and Dumplings Recipe
Okay, it’s amazing straight-up, but here are some serving ideas:
- Simple Perfection: Hot bowl, lots of fresh parsley, extra black pepper. Done.
- Bread Required: Seriously, get some crusty bread. You need it to sop up every last drop of that incredible broth. It’s practically mandatory!
- Salad on the Side: A simple green salad with a light vinaigrette just cuts through the richness nicely.
- Kick it Up?: A dash of hot sauce in your own bowl? Don’t mind if I do!
- Peak Cozy: Eating this while wearing fuzzy socks? Highly recommended for maximum comfort!
Leftover Strategy for Your Bisquick Chicken and Dumplings Recipe
IF, and I mean if, you have leftovers (it vanishes fast in my house!), here’s how to handle them:
- Cool Down First: Let it cool on the counter for a bit (no more than 2 hours!) before it goes in the fridge.
- Airtight: Store it in a container with a good lid.
- Fridge: Good for 3-4 days. Lunch tomorrow? Yes, please!
- Freezer: The soup base without the cream/milk and dumplings freezes really well! Thaw, reheat, add dairy, make fresh dumplings. Cooked dumplings get weird and rubbery when frozen and reheated, so I don’t recommend freezing the whole finished dish.
- Reheating: Low and slow on the stovetop is best. Gentle heat, maybe add a splash of broth if it’s thickened up a lot. Microwaving works, but be gentle!
Why I Genuinely LOVE This Recipe (And You Will Too!)
Okay, maybe I’m getting emotional about soup, but this Bisquick chicken and dumplings recipe is just IT for me. It’s easy. It’s forgiving. It tastes like pure comfort and love in a bowl. It makes the house smell incredible. It’s proof that amazing food doesn’t need to be fussy or take all day long. It just works.
It’s my answer for:
- Gloomy days that need brightening
- When someone needs a little pick-me-up
- Easy Sunday dinners
- Literally any time you need a guaranteed hug in a bowl
So please, from my kitchen to yours, give this a try! Embrace the easy, enjoy the process, and get ready for some serious yum.
And seriously, tell me how it goes! Did you make it? Did you love it? Did you change anything? Drop a comment below – I genuinely get so excited hearing about your cooking adventures! Happy dumpling making!
Recipes You May Like
Bisquick chicken and dumplings recipe
The ultimate easy Bisquick chicken and dumplings recipe! Get secrets for fluffy dumplings & quick, cozy comfort food perfect for weeknights. Learn how!
Ingredients
- About 1.5 lbs boneless, skinless chicken (thighs are awesome for flavor!)
- 2 tablespoons butter OR olive oil
- 1 large yellow onion, chopped small (about 1.5 cups worth)
- 2-3 medium carrots, peeled & sliced/diced (about 1 cup)
- 2-3 celery stalks, sliced/diced (about 1 cup)
- 2-3 cloves garlic, minced up (or hey, add more!)
- 1/4 cup all-purpose flour
- 6 cups low-sodium chicken broth (important for controlling salt!)
- 1 teaspoon dried thyme
- 1/2 teaspoon dried rosemary, maybe give it a little crush
- 1/2 teaspoon black pepper (fresh cracked is best!)
- Salt to taste (start with 1/2 tsp, add more later if needed)
- Optional: 1 bay leaf (just remember to take it out!)
- 1/2 cup heavy cream OR half-and-half (for richness, optional)
- 1 cup frozen peas (or corn!)
- Fresh parsley, chopped (for sprinkling at the end)
- 2 cups Original Bisquick™ Mix
- 2/3 cup milk (whole works great)
- Optional: 1 tablespoon chopped fresh parsley or chives (mix right in!)
Instructions
Step 1: Sauté Those Veggies!
Get your big pot or Dutch oven heating over medium heat with the butter or oil. Toss in the onion, carrots, and celery. Let them soften up, get friendly in the pot, for about 5-7 minutes, stirring now and then. You want them tender, not browned. Now add the garlic and stir for just one more minute until you smell that amazing garlicky goodness. My two cents: Don’t rush this! Building flavor slowly here is key.
Step 2: Make it Thick & Saucy!
Sprinkle the flour right over the cooked veggies. Stir it constantly for a minute or maybe two. You’re just cooking off that raw flour taste – nobody wants that! Okay, now slowly, slowly start whisking in the chicken broth. Add just a splash at first and whisk well to avoid lumps, then gradually add the rest, whisking as you go. Bring it all to a nice gentle simmer. Seriously, whisking while adding the broth = smooth soup success!
Step 3: Chicken Goes In, Heat Goes Down!
Carefully add your chicken pieces to the pot. Stir in the thyme, rosemary, black pepper, and that bay leaf if you’re using it. Let it come back to a gentle simmer (little bubbles, not a rolling boil!), then turn the heat way down to low, cover the pot, and let it simmer away for 20-25 minutes. The chicken should be cooked through and tender enough to shred easily. Check it: No pink inside? Easy to pull apart? It’s ready!
Step 4: Shred Chicken, Prep Dumplings!
Okay, carefully fish the chicken out and put it on a cutting board. Let it cool just enough so you don’t burn your fingers! While it’s cooling, taste that beautiful broth. Need more salt? A bit more pepper? Now’s the time! Stir in the cream or half-and-half if you’re using it, and toss in the frozen peas. Keep the soup simmering very gently. Now, for the dumplings! In a bowl, just stir the Bisquick mix and milk together. Listen carefully: DO NOT OVERMIX! Stop as soon as it’s combined. A few lumps are totally fine, actually good! Overmixing = tough dumplings, and nobody wants that. Stir in any herbs now too.
Step 5: Dumpling Time! (It’s Showtime!)
Using two spoons, or a little ice cream scoop if you have one, gently drop spoonfuls of the batter onto the simmering soup. Don’t crowd them too much; they need room to puff up! Once all the batter is happily plopped in, put the lid on tight. And now for the hard part: Walk away for 10 minutes. Don’t lift the lid! Don’t peek! Let that steam work its magic. After 10 minutes, take the lid off. Let them simmer gently, uncovered, for another 5-10 minutes until they look fluffy and cooked through. Wanna be sure? A toothpick stuck in the center should come out clean. Getting these dumplings right is the soul of this easy Bisquick chicken and dumplings recipe.
Step 6: Finish Line & Happy Bowls!
While those dumplings finish cooking, quickly shred the chicken (two forks make this super easy). Gently stir the shredded chicken back into the pot. Remember to grab that bay leaf out! Give everything one last gentle stir – be nice to those dumplings! Now, ladle generous servings of your incredible Bisquick chicken and dumplings recipe into bowls. Make sure everyone gets a bit of everything – chicken, veggies, creamy broth, and plenty of those amazing dumplings. Sprinkle with lots of fresh parsley! Dig in!
Notes
Chicken Thighs: Seriously consider using chicken thighs; they stay juicier and add great flavor
Don't overmix the dumplings: This is the first secret to fluffy dumplings. Mix until the flour is completely gone. Lumps are the answer!
Don't look!: When the dumplings start to steam (step 5), resist the urge to lift the lid for the first 10 minutes. Trust the process!
Storage: Leftovers are great! Store the cooled soup in an airtight container in the refrigerator (3-4 days). Gently reheat on the stovetop. Freezing the soup before adding the dumplings is helpful, but cooked dumplings don't freeze well (they become thick).
Customize: Feel free to add more vegetables (mushrooms, spinach) or adjust the seasoning to your liking!
Nutrition Information:
Yield: 6 servings.Amount Per Serving:Calories: Approx. 450-550 kcal per serving
There are no reviews yet. Be the first one to write one.